Inputs
Introduction
Inputs allow users to customize values in a script through the Settings/Inputs tab. By using inputs, developers can create scripts that are easily adaptable to user preferences.
Below is a script that plots a 20-period Simple Moving Average (SMA) using talib.sma(close, 20). Although this code is simple, it lacks flexibility because the function call uses fixed source and length arguments, which users cannot modify without editing the script directly:
indicator("MA", "", true)
plot(talib.sma(close, 20))
If we structure our script this way, it becomes much more flexible, as users can choose the source and length values they want to use directly from the Settings/options tab without needing to modify the source code:
indicator("MA", "", true)
sourceInput = input(close, "Source")
lengthInput = input(20, "Length")
plot(talib.sma(sourceInput, lengthInput))
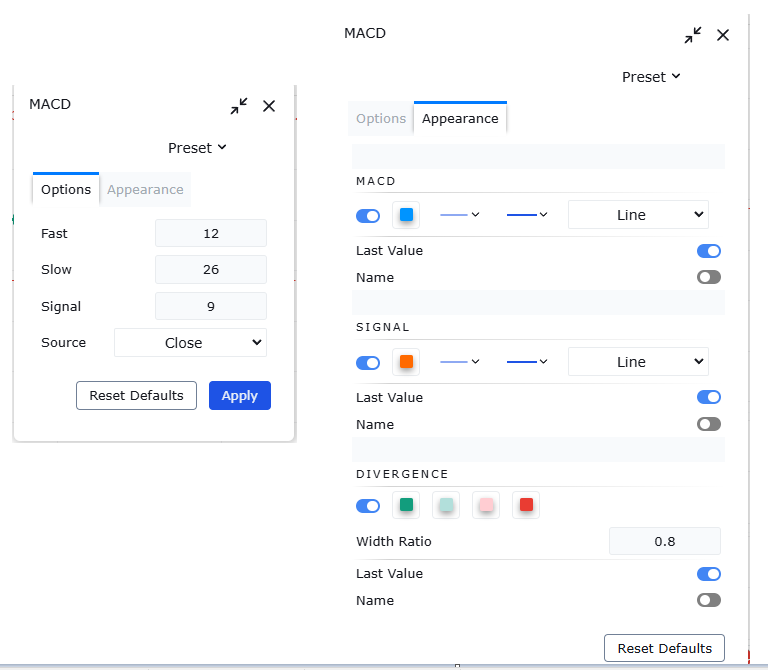
Inputs are accessible only while a script is running on a chart. Users can access script inputs through the Settings dialog box. To open this dialog, users can:
- Double-click on the name of an on-chart indicator.
- Right-click on the script’s name and select the Settings item from the dropdown menu.
- Choose the Settings item from the More menu icon (three dots) that appears when hovering over the indicator’s name on the chart.
The Settings dialog always include the Appearance tabs, allowing users to customize the script’s visual appearance.
When a script contains calls to input.*() functions, an additional Options tab is displayed in the Settings dialog box.
Scripts process inputs when users add them to the chart or modify values in the Settings/Inputs tab. Any changes to a script’s inputs cause it to re-execute across all available data using the newly specified values.
Input Functions
Lipi Script features the following input functions:
input()input.int()input.float()input.bool()input.color()input.string()input.text_area()input.price()input.source()
Scripts create input widgets in the Inputs tab, which accept various types of inputs based on their input.*() function calls. By default, each input appears on a new line in the Inputs tab in the order the input.*() calls are made. Programmers can also organize inputs in different ways using the input.*() functions’ group and inline parameters. See the section below for more information.
Our Style Guide recommends placing input.*() calls at the beginning of the script.
Input functions typically include several parameters, allowing programmers to define default values, value limits, organization in the Inputs tab, and other properties.
Since a input.*() call is simply another function call in Lipi Script, programmers can combine them with arithmetic, comparison, logical, and ternary operators to assign expressions to variables.
All values returned by input.*() functions, except for “source” ones, are “input” qualified values. Refer to our User Manual’s section on type qualifiers for more details.
Input Function Parameters
The parameters common to all input functions include: defval, title, tooltip, inline, group, and display. Some input functions also have additional parameters: minval, maxval, step, and confirm.
All these parameters require “const” arguments, with two exceptions:
- The
defvalparameter of thesourceinput. input.source()uses “series float” values.
Since input.*() parameters typically accept “const” arguments, and “input” qualifiers are stronger than “const,” it is not possible to use the result of one input.*() call as an argument for another input.*() call.
Parameter Descriptions:
-
defval
The first parameter for all input functions. It specifies the default value displayed in the input widget. It must match the type of input value the function uses. -
title
A “const string” argument that acts as the field’s label. -
tooltip
A “const string” argument that adds a question mark icon next to the field. When users hover over it, the tooltip’s text appears. If multiple fields are grouped inline, the tooltip for the last field in the group will be displayed to the right. Newlines (\n) are supported in the tooltip text. -
inline
A “const string” argument that groups multiple input widgets on the same line when the same argument is used acrossinput.*()calls. It also allows aligning the field immediately after the label if a unique value is used. -
group
A “const string” argument used to group inputs into orgParameter Descriptions
-
minval
Requires aconst intorconst floatargument, depending on the type of thedefvalvalue. It specifies the minimum valid value for the input field. -
maxval
Requires aconst intorconst floatargument, depending on the type of thedefvalvalue. It specifies the maximum valid value for the input field. -
step
Defines the increment by which the field’s value will change when the widget’s up/down arrows are used. -
confirm
Requires aconst bool(trueorfalse) argument. This parameter determines the behavior of the script when added to a chart. -
If
confirm = true, the Settings/Inputs tab will appear automatically when the script is added to the chart. -
This is helpful to ensure users configure specific fields before using the script.
The minval, maxval, and step parameters are exclusively available in the signature of the input.int() and input.float() functions.
Input Types
The following sections explain the purpose of each input function and explore the various ways to use input functions and organize their display.
Generic Input
The input() function is a simple, generic utility that supports the fundamental Lipi Script types:
intfloatboolcolorstring
Additionally, it supports source inputs, which are price-related values (e.g., close, hl2, hlc3, hlcc4) or can be used to receive the output value of another script.
Its signature is:
input(defval, title, tooltip, inline, group) → input int/float/bool/color/string | series floatThe function automatically determines the type of input by analyzing the type of the defval argument provided in the function call.
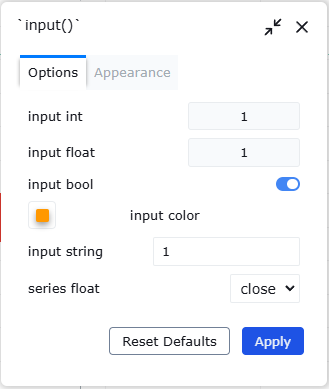
This script demonstrates all the supported types and the qualified type returned by the function when used with defval arguments of different types:
indicator("`input()`", "", true)
a = input(1, "input int")
b = input(1.0, "input float")
c = input(true, "input bool")
d = input(color.orange, "input color")
e = input("1", "input string")
f = input(close, "series float")
plot(na)
Integer Input
There is only one signature for the input.int() function
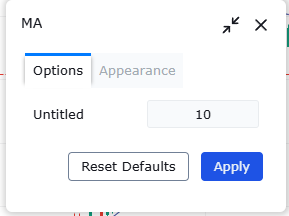
input.int(defval, title, minval, maxval, step, tooltip, inline, group, confirm) → input intThis one uses the minval parameter to limit the length:
indicator("MA", "", true)
maLengthInput = input.int(10, (minval = 2))
ma = talib.sma(close, maLengthInput)
plot(ma)
A simple input widget is provided to enter the value:
Float Input
The input.float() function only one signature:
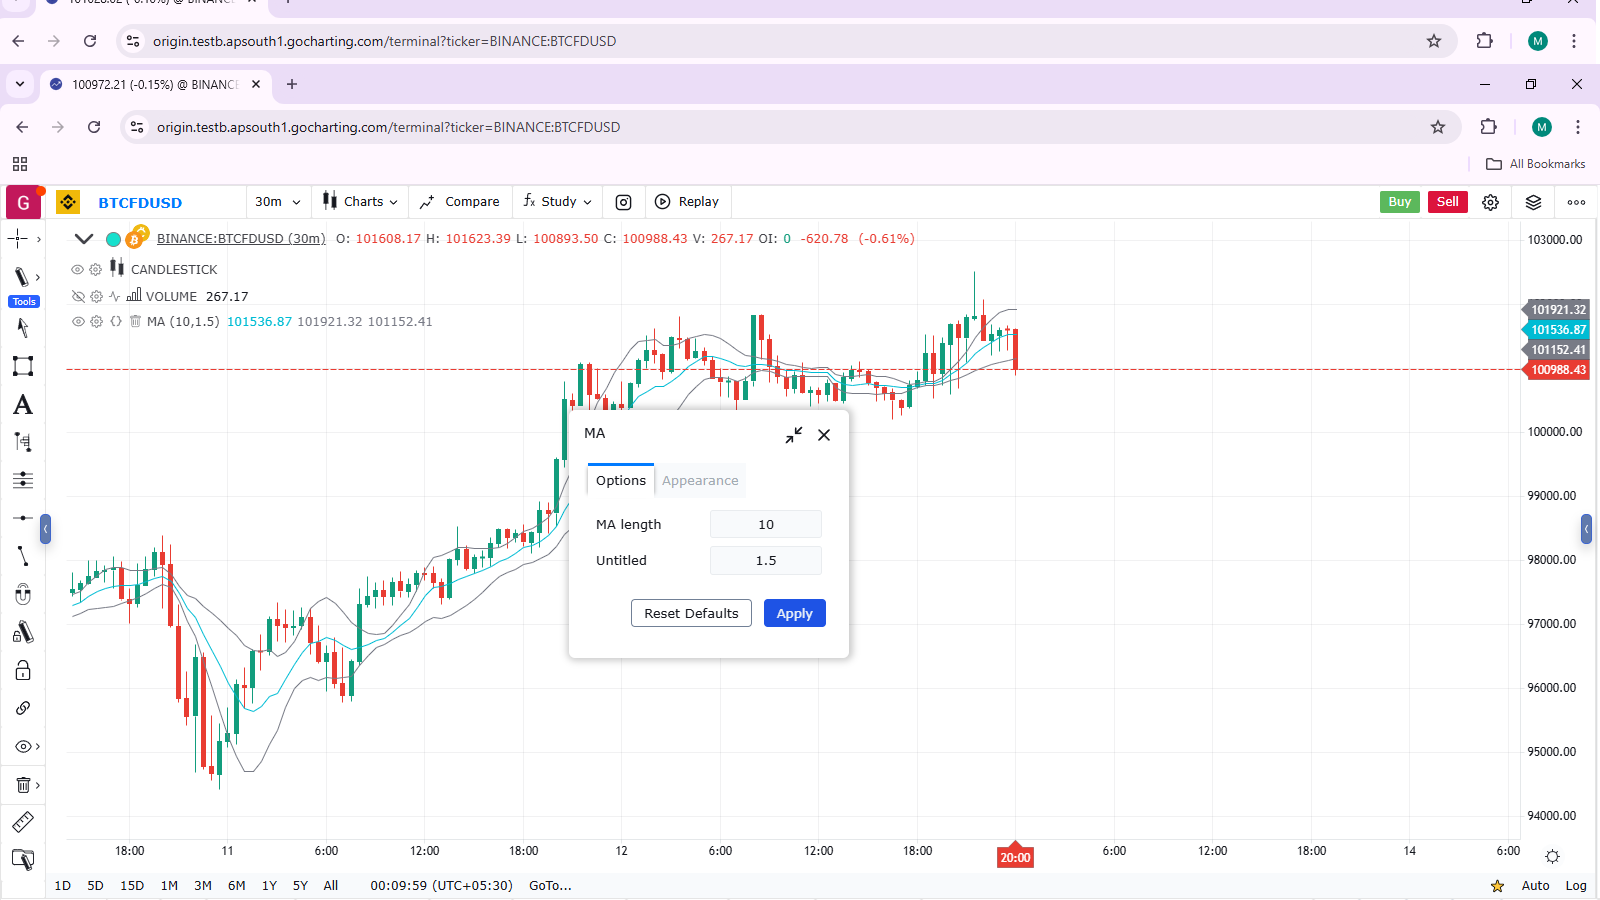
input.float(defval, title, minval, maxval, step, tooltip, inline, group, confirm) → input intHere, we use a “float” input for the factor used to multiply the standard deviation to calculate Bollinger Bands:
indicator("MA", "", true)
maLengthInput = input.int(10,    "MA length", minval = 1)
bbFactorInput = input.float(1.5, (minval = 0), (step = 0.5))
ma = talib.sma(close, maLengthInput)
bbWidth = talib.stdev(ma, maLengthInput) * bbFactorInput
bbHi    = ma + bbWidth
bbLo    = ma - bbWidth
plot(ma, "MA", color.aqua)
plot(bbHi, "BB Hi", color.gray)
plot(bbLo, "BB Lo", color.gray)
The input widgets for floats are similar to those used for integer inputs:
Boolean Input
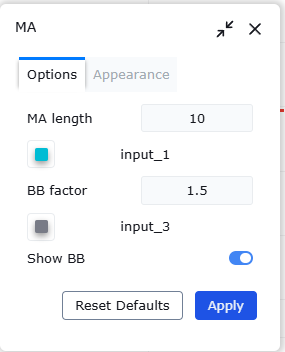
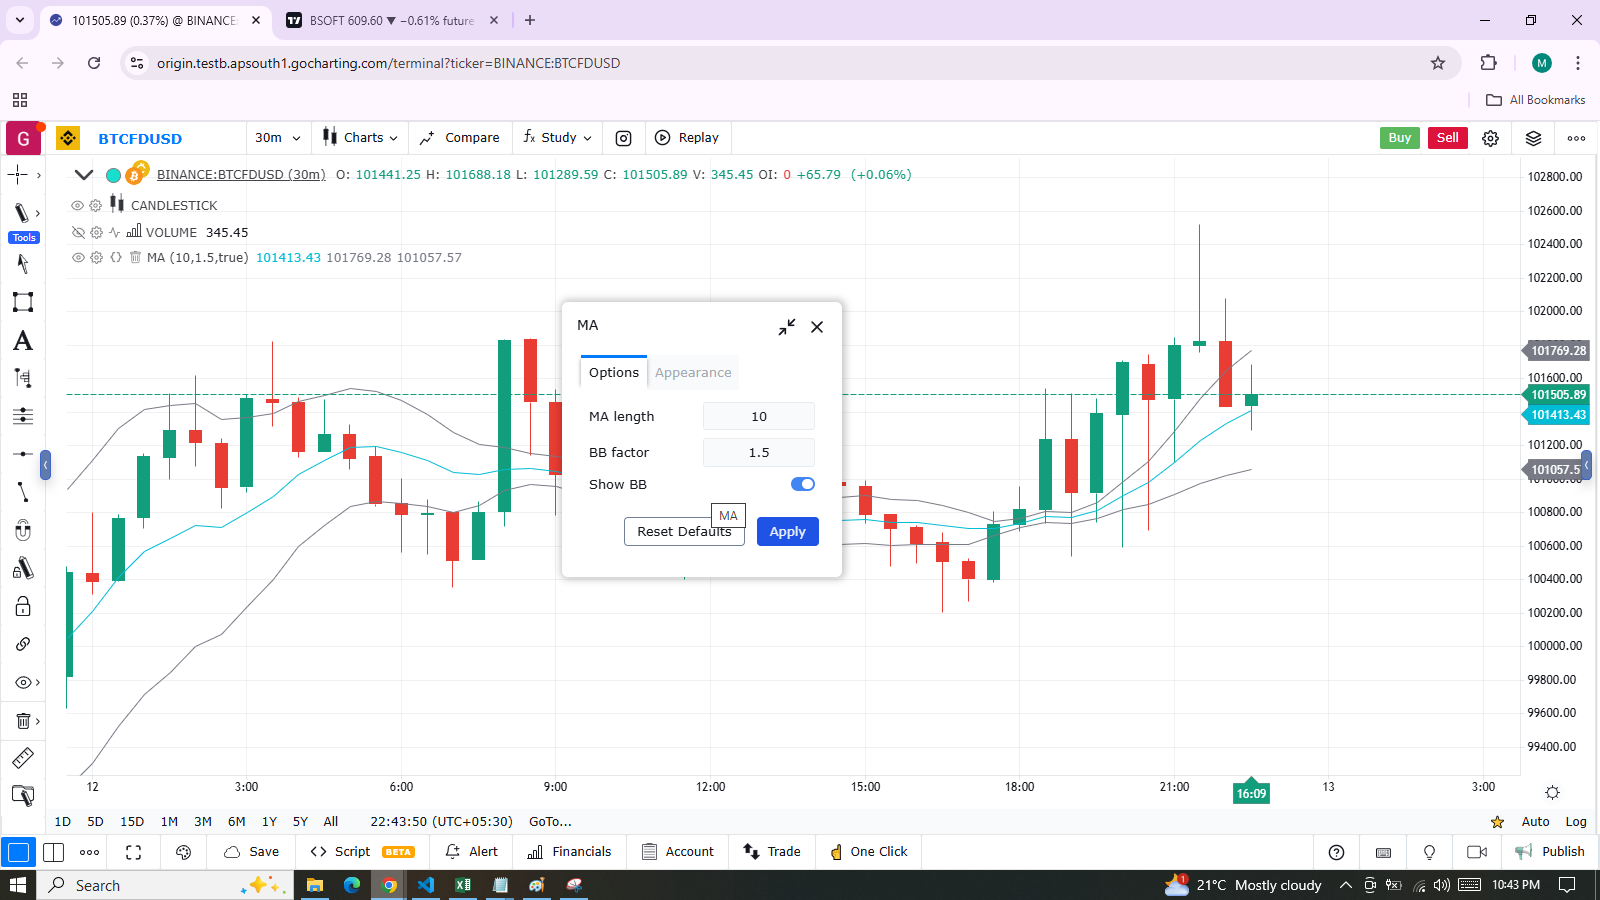
Let’s continue developing our script by adding a boolean input to allow users to toggle the display of the Bollinger Bands (BBs):
indicator("MA", "", true)
maLengthInput = input.int(10,    "MA length", minval = 1)
bbFactorInput = input.float(1.5, "BB factor", inline = "01", minval = 0, step = 0.5)
showBBInput   = input.bool(true, "Show BB",   inline = "01")
ma      = talib.sma(close, maLengthInput)
bbWidth = talib.stdev(ma, maLengthInput) * bbFactorInput
bbHi    = ma + bbWidth
bbLo    = ma - bbWidth
plot(ma, "MA", color.aqua)
plot(showBBInput ? bbHi : na, "BB Hi", color.gray)
plot(showBBInput ? bbLo : na, "BB Lo", color.gray)
Note that:
- We have added an input using
input.bool()to set the value ofshowBBInput. - We use the
inlineparameter in that input and in the one forbbFactorInputto place them on the same line. We use"01"for its argument in both cases. This is how the Lipi Script compiler recognizes that they belong on the same line. The particular string used as the argument is unimportant and does not appear anywhere in the “Inputs” tab; it is only used to identify which inputs should appear on the same line. - We have vertically aligned the
titlearguments of ourinput.*()calls to make them easier to read. - We use the
showBBInputvariable in our twoplot()calls to plot conditionally. When the user unchecks the checkbox of theshowBBInputinput, the variable’s value becomesfalse. When that happens, ourplot()calls plot thenavalue, which displays nothing. We usetrueas the default value of the input, so the BBs plot by default. - Because we use the
inlineparameter for thebbFactorInputvariable, its input field in the “Inputs” tab does not align vertically with that ofmaLengthInput, which doesn’t useinline.
Color Input
As explained in this section of the Colors page, selecting the colors of a script’s outputs via the “Settings/Apppearance” tab is not always possible. In cases where one cannot choose colors from the “Appearance” tab, programmers can create color inputs with the input.color() function to allow color customization from the “Settings/Options” tab.
Suppose we wanted to plot our Bollinger Bands (BBs) with lighter transparency when the high and low values are higher or lower than the BBs. We can use a code like this to create the colors:
bbHiColor = color.new(color.gray, high > bbHi ? 60 : 0)
bbLoColor = color.new(color.gray, low < bbLo ? 60 : 0)
When using dynamic (“series”) color components like the transp arguments in the above code, the color widgets in the “Settings/Appearance” tab will no longer appear. Let’s create our own input for color selection, which will appear in the “Settings/Options” tab:
indicator("MA", "", true);
maLengthInput = input.int(10, "MA length", (inline = "01"), (minval = 1))
maColorInput = input.color(color.aqua, "", (inline = "01"))
bbFactorInput = input.float(1.5,"BB factor", (inline = "02"), (minval = 0), (step = 0.5))
bbColorInput = input.color(color.gray, "", (inline = "02"))
showBBInput = input.bool(true, "Show BB", (inline = "02"))
ma = talib.sma(close, maLengthInput)
bbWidth = talib.stdev(ma, maLengthInput) * bbFactorInput
bbHi = ma + bbWidth
bbLo = ma - bbWidth
bbHiColor = color.new(bbColorInput, high > bbHi ? 60 : 0)
bbLoColor = color.new(bbColorInput, low < bbLo ? 60 : 0)
plot(ma, "MA", maColorInput)
plot(showBBInput ? bbHi : na, "BB Hi", bbHiColor, 2)
plot(showBBInput ? bbLo : na, "BB Lo", bbLoColor, 2)
Note that:
- We have added two calls to
input.color()to gather the values of themaColorInputandbbColorInputvariables. We usemaColorInputdirectly in theplot(ma, "MA", maColorInput)call, and we usebbColorInputto build thebbHiColorandbbLoColorvariables, which modulate the transparency based on the position of the price relative to the Bollinger Bands (BBs). We use a conditional value for thetranspargument we callcolor.new()with, to generate different transparencies of the same base color. - We do not use a
titleargument for our new color inputs because they are on the same line as other inputs, allowing users to understand to which plots they apply. - We have reorganized our
inlinearguments so they reflect the fact that we have inputs grouped on two distinct lines.
Source Input
Source inputs are useful to provide a selection of two types of sources:
- Price values, namely: open, high, low, close, hl2, hlc3, and ohlc4.
- The values plotted by other scripts on the chart. This can be useful to “link” two or more scripts together by sending the output of one as an input to another script.
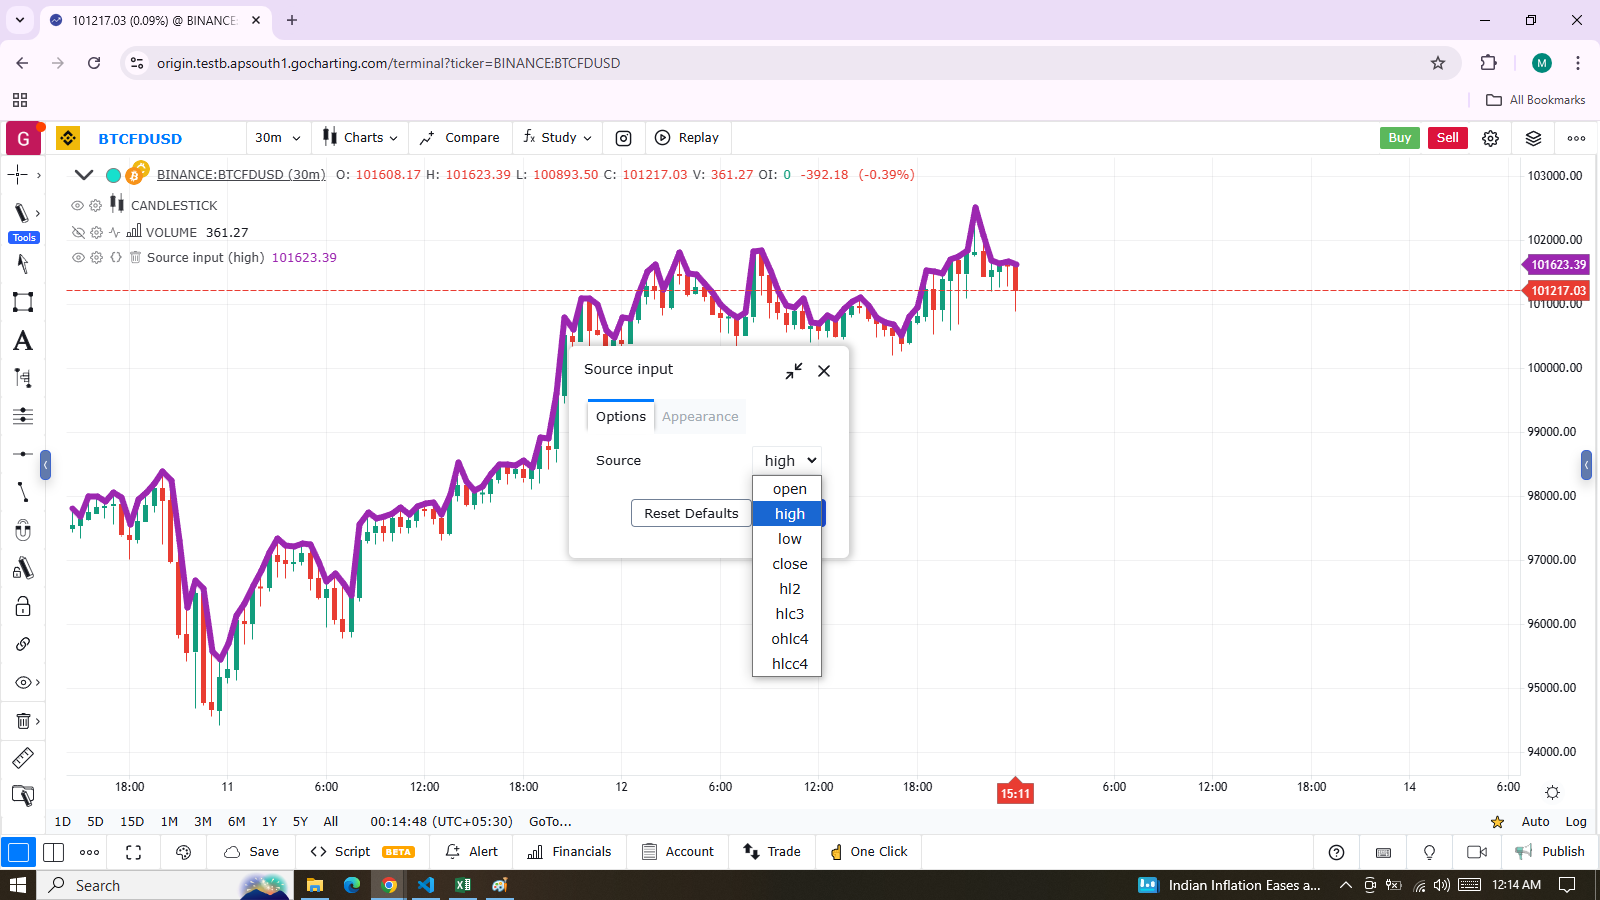
This script simply plots the user’s selection of source. We propose the high as the default value:
indicator("Source input", "", true)
srcInput = input.source(high, "Source")
plot(srcInput, "Src", color.new(color.purple, 70), 6)
This shows a chart where, in addition to our script, we have loaded an “Arnaud Legoux Moving Average” indicator.
See here how we use our script’s source input widget to select the output of the ALMA script as an input into our script. Because our script plots that source in a light-purple thick line, you see the plots from the two scripts overlap because they plot the same value:
Tips
The design of your script’s inputs significantly affects the usability of your scripts. Well-designed inputs improve intuitiveness and enhance the overall user experience:
- Choose clear and concise labels for your input titles.
- Select default values carefully.
- Define
minvalandmaxvalto prevent unexpected results in your code, such as limiting the minimal value of lengths to 1 or 2, depending on the type of moving average you are using. - Set step values that are appropriate for the value range. For example, steps of 5 are suitable for a 0-200 range, or steps of 0.05 for a 0.0-1.0 scale.
- Group related inputs on the same line using
inline, such as bull and bear colors or the width and color of a line. - Organize related inputs into meaningful sections using
group, placing the most important sections at the top. - Align input arguments vertically for better readability and ease of editing. This allows you to use the Editor’s multi-cursor feature for global changes across multiple lines.
- In some cases, using Unicode spaces can help achieve optimal alignment in inputs. Here is an example:
indicator("Aligned inputs", "", true)

static GRP1 = "Not aligned"
ma1SourceInput  = input(close, "MA source", inline = "11", group = GRP1)
ma1LengthInput  = input(close, "Length", inline = "11", group = GRP1)
long1SourceInput = input(close, "Signal source", inline = "12", group = GRP1)
long1LengthInput = input(close, "Length", inline = "12", group = GRP1)

static GRP2 = "Aligned"
// The three spaces after "MA source" are Unicode EN spaces (U+2002).
ma2SourceInput = input(close, "MA source",inline = "21", group = GRP2)
ma2LengthInput  = input(close, "Length", inline = "21", group = GRP2)
long2SourceInput = input(close, "Signal source", inline = "22", group = GRP2)
long2LengthInput = input(close, "Length", inline = "22", group = GRP2)

plot(talib.vwma(close, 10))
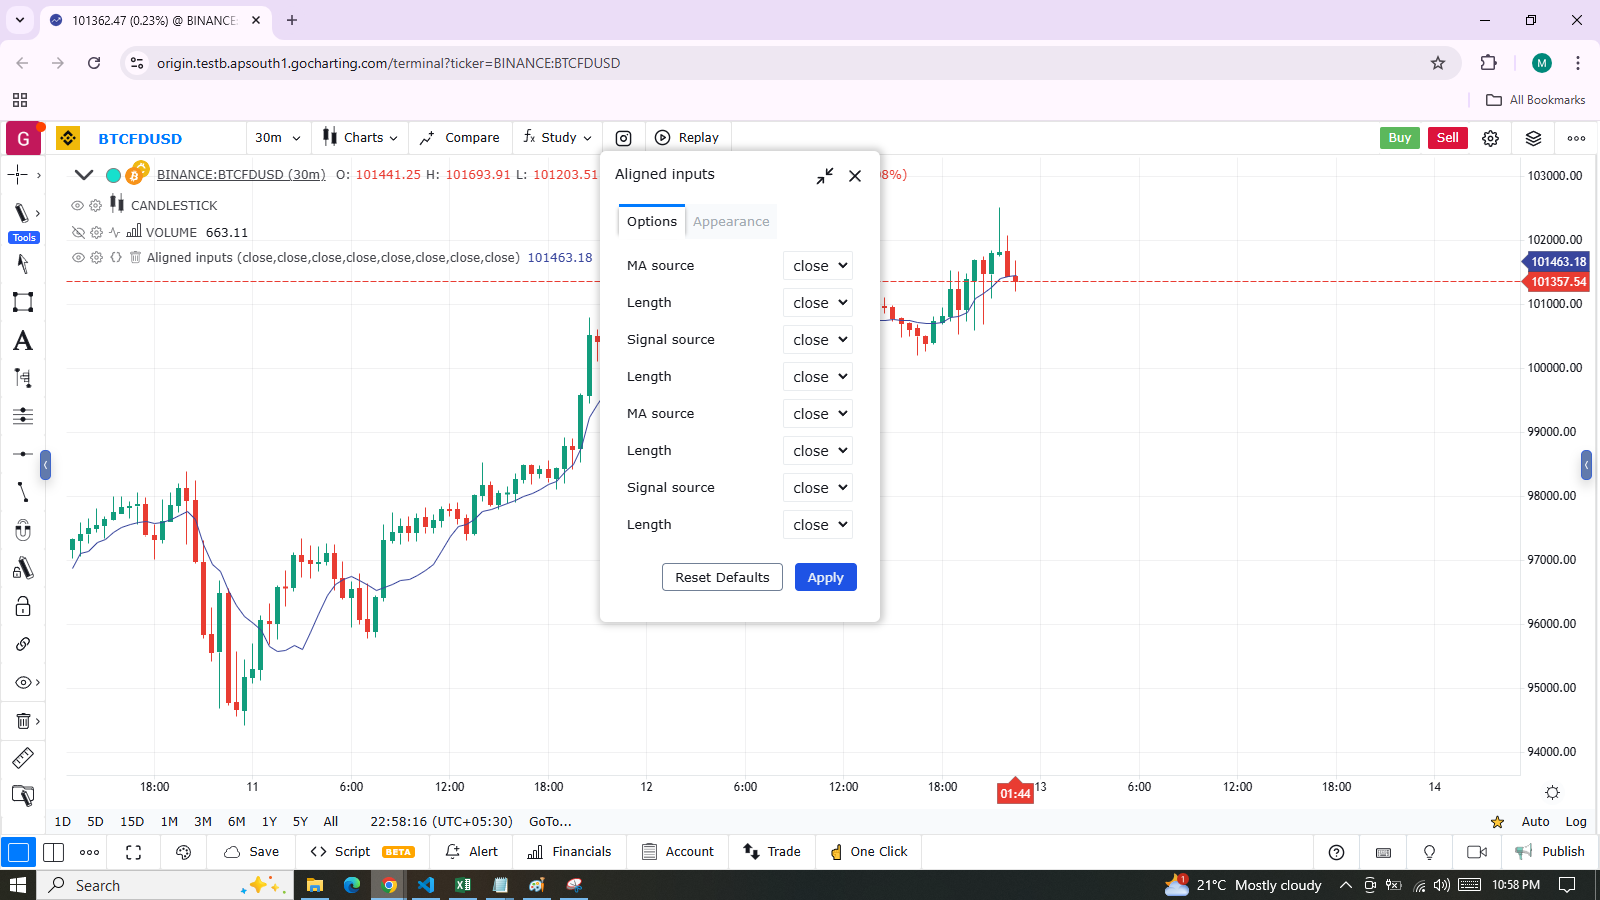
Note
- We use the
groupparameter to separate the inputs into two distinct sections. A constant holds the group name, so if we need to change it, we only need to update it in one place. - The input widgets in the first section do not align vertically. This is because we use
inline, which places input widgets immediately to the right of the label. However, the labels forma1SourceInputandlong1SourceInputare of different lengths, causing their labels to be positioned at different vertical levels. - To correct this misalignment, we add three Unicode EN spaces (U+2002) to the
titleargument of thema2SourceInputline. Regular spaces would be stripped from the label, so Unicode spaces are necessary for precise alignment. You can achieve accurate alignment by using different quantities and types of Unicode spaces. For a list of Unicode spaces of varying widths, refer to this resource.
