Community Trading Analysis & Chart Ideas
Explore Market Insights · Technical Analysis · Trading Ideas
Discover trading ideas from the GoCharting community
 Bullish
 NIFTY
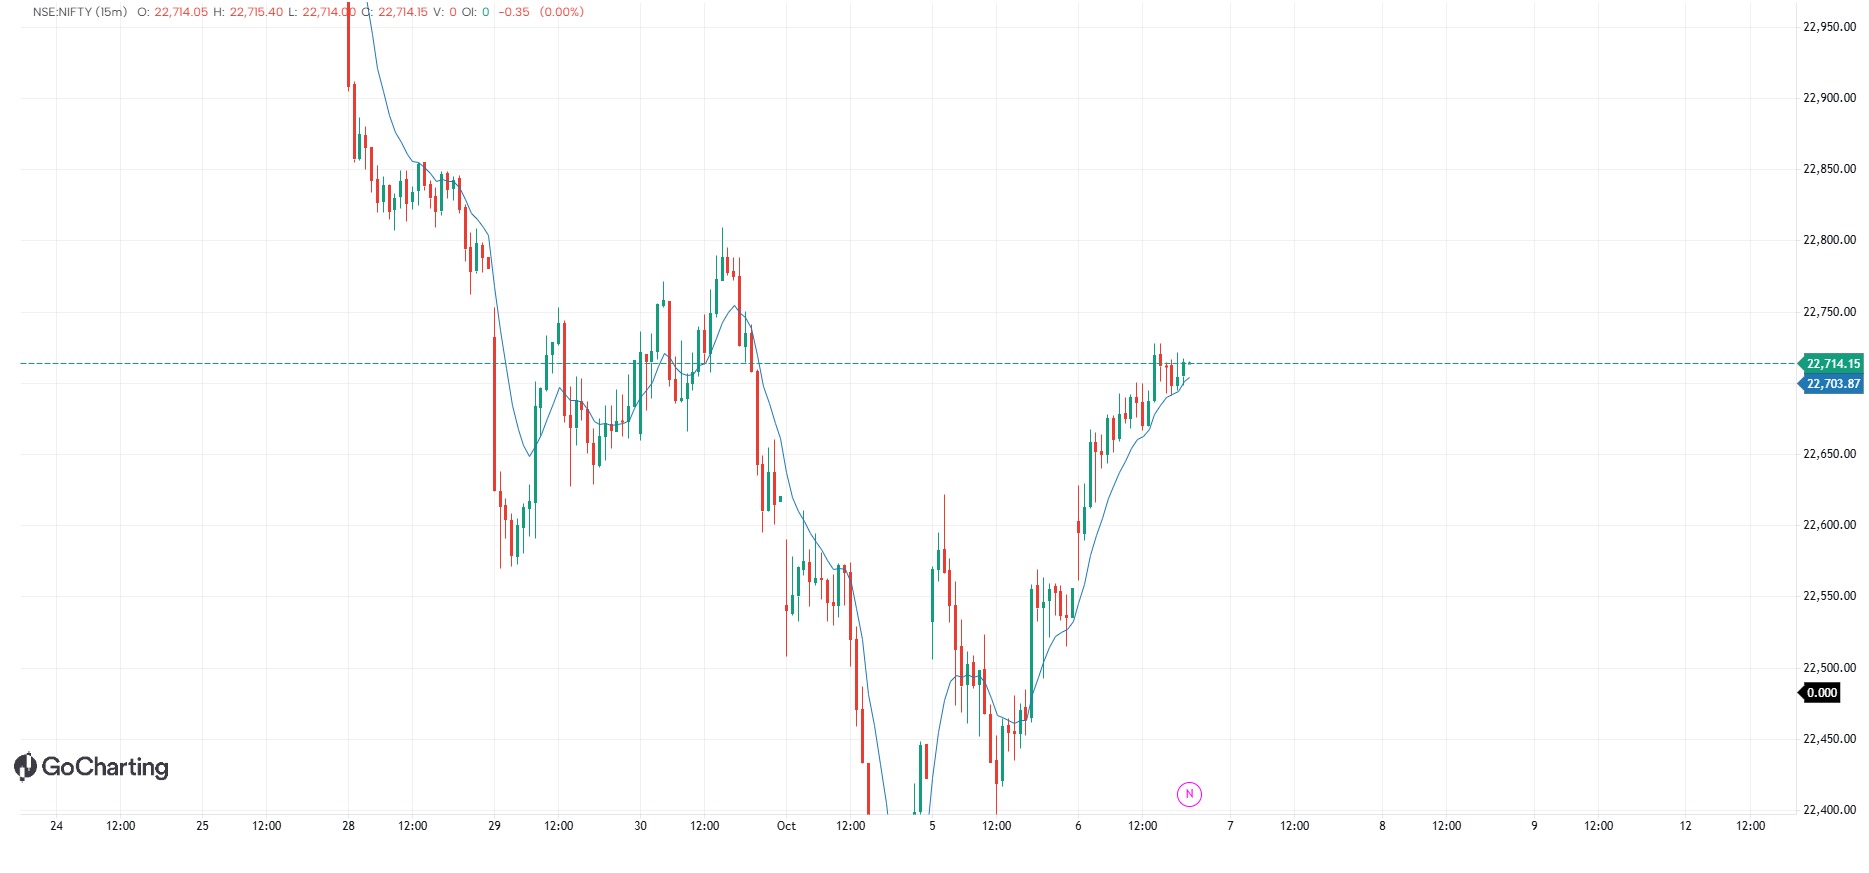
NIFTY22700 CE @ 41
Based on the Open Interest (OI) data, the market is structurally in a highly bullish setup, heavily driven by contrarian indicators and put writers. Here is the strategic breakdown of why this indicates strength: Aggressive Put Writing: The total Put OI (83.83 lakh) is exactly double the Call OI (41.85 lakh). In Indian option chains (NSE), options are viewed from the perspective of option sellers (writers) who risk significant capital. A massive build-up of puts means institutional writers are strongly defending the lower levels, treating them as solid rock bottoms.
 [email protected]·2h ago
 Bearish
 XAUUSD
trading view
//@version=6 indicator("SMART AI - Forex Multi Timeframe", overlay=true) //──────────────────────────────────────────── // SETTINGS //──────────────────────────────────────────── fastLen = input.int(20, "Fast EMA") slowLen = input.int(50, "Slow EMA") rsiLen = input.int(14, "RSI Length") adxLen = input.int(14, "ADX Length") //──────────────────────────────────────────── // TREND FUNCTION //──────────────────────────────────────────── getTrend() => emaFast = ta.ema(close, fastLen) emaSlow = ta.ema(close, slowLen) rsiVal = ta.rsi(close, rsiLen) macdLine = ta.ema(close, 12) - ta.ema(close, 26) signalLine = ta.ema(macdLine, 9) bullish = emaFast > emaSlow and rsiVal > 50 and macdLine > signalLine bearish = emaFast bullish ? 1 : bearish ? -1 : 0 //──────────────────────────────────────────── // MULTI TIMEFRAME DATA //──────────────────────────────────────────── monthly = request.security(syminfo.tickerid, "1M", getTrend()) weekly = request.security(syminfo.tickerid, "1W", getTrend()) daily = request.security(syminfo.tickerid, "1D", getTrend()) h12 = request.security(syminfo.tickerid, "720", getTrend()) h8 = request.security(syminfo.tickerid, "480", getTrend()) h4 = request.security(syminfo.tickerid, "240", getTrend()) h2 = request.security(syminfo.tickerid, "120", getTrend()) h1 = request.security(syminfo.tickerid, "60", getTrend()) m30 = request.security(syminfo.tickerid, "30", getTrend()) m15 = request.security(syminfo.tickerid, "15", getTrend()) m5 = request.security(syminfo.tickerid, "5", getTrend()) m3 = request.security(syminfo.tickerid, "3", getTrend()) m1 = request.security(syminfo.tickerid, "1", getTrend()) //──────────────────────────────────────────── // HELPER //──────────────────────────────────────────── trendText(v) => v == 1 ? "Bullish" : v == -1 ? "Bearish" : "Neutral" trendColor(v) => v == 1 ? color.lime : v == -1 ? color.red : color.orange //──────────────────────────────────────────── // SCORE //──────────────────────────────────────────── score = monthly + weekly + daily + h12 + h8 + h4 + h2 + h1 + m30 + m15 + m5 + m3 + m1 totalTF = 13 bullCount = (monthly == 1 ? 1 : 0) + (weekly == 1 ? 1 : 0) + (daily == 1 ? 1 : 0) + (h12 == 1 ? 1 : 0) + (h8 == 1 ? 1 : 0) + (h4 == 1 ? 1 : 0) + (h2 == 1 ? 1 : 0) + (h1 == 1 ? 1 : 0) + (m30 == 1 ? 1 : 0) + (m15 == 1 ? 1 : 0) + (m5 == 1 ? 1 : 0) + (m3 == 1 ? 1 : 0) + (m1 == 1 ? 1 : 0) bearCount = (monthly == -1 ? 1 : 0) + (weekly == -1 ? 1 : 0) + (daily == -1 ? 1 : 0) + (h12 == -1 ? 1 : 0) + (h8 == -1 ? 1 : 0) + (h4 == -1 ? 1 : 0) + (h2 == -1 ? 1 : 0) + (h1 == -1 ? 1 : 0) + (m30 == -1 ? 1 : 0) + (m15 == -1 ? 1 : 0) + (m5 == -1 ? 1 : 0) + (m3 == -1 ? 1 : 0) + (m1 == -1 ? 1 : 0) overall = bullCount > bearCount ? "Bullish" : bearCount > bullCount ? "Bearish" : "Neutral" alignment = math.round(math.max(bullCount, bearCount) / totalTF * 100) //──────────────────────────────────────────── // SIGNAL LOGIC //──────────────────────────────────────────── longSetup = daily == 1 and h4 == 1 and h1 == 1 and m15 == 1 and m5 == 1 shortSetup = daily == -1 and h4 == -1 and h1 == -1 and m15 == -1 and m5 == -1 signal = longSetup ? "BUY SETUP" : shortSetup ? "SELL SETUP" : "WAITING" //──────────────────────────────────────────── // DASHBOARD //──────────────────────────────────────────── var table dash = table.new( position.top_right, 2, 19, border_width=1, frame_width=1) if barstate.islast table.cell(dash, 0, 0, "SMART AI 🔥", text_color=color.orange, bgcolor=color.black) table.cell(dash, 1, 0, "ACTIVE", text_color=color.lime, bgcolor=color.black) table.cell(dash, 0, 1, "Monthly Trend") table.cell(dash, 1, 1, trendText(monthly), text_color=trendColor(monthly)) table.cell(dash, 0, 2, "Weekly Trend") table.cell(dash, 1, 2, trendText(weekly), text_color=trendColor(weekly)) table.cell(dash, 0, 3, "Daily Trend") table.cell(dash, 1, 3, trendText(daily), text_color=trendColor(daily)) table.cell(dash, 0, 4, "12H Trend") table.cell(dash, 1, 4, trendText(h12), text_color=trendColor(h12)) table.cell(dash, 0, 5, "8H Trend") table.cell(dash, 1, 5, trendText(h8), text_color=trendColor(h8)) table.cell(dash, 0, 6, "4H Trend") table.cell(dash, 1, 6, trendText(h4), text_color=trendColor(h4)) table.cell(dash, 0, 7, "2H Trend") table.cell(dash, 1, 7, trendText(h2), text_color=trendColor(h2)) table.cell(dash, 0, 8, "1H Trend") table.cell(dash, 1, 8, trendText(h1), text_color=trendColor(h1)) table.cell(dash, 0, 9, "30min Trend") table.cell(dash, 1, 9, trendText(m30), text_color=trendColor(m30)) table.cell(dash, 0, 10, "15min Trend") table.cell(dash, 1, 10, trendText(m15), text_color=trendColor(m15)) table.cell(dash, 0, 11, "5min Trend") table.cell(dash, 1, 11, trendText(m5), text_color=trendColor(m5)) table.cell(dash, 0, 12, "3min Trend") table.cell(dash, 1, 12, trendText(m3), text_color=trendColor(m3)) table.cell(dash, 0, 13, "1min Trend") table.cell(dash, 1, 13, trendText(m1), text_color=trendColor(m1)) table.cell(dash, 0, 14, "Overall Trend") table.cell(dash, 1, 14, overall, text_color=overall == "Bullish" ? color.lime : overall == "Bearish" ? color.red : color.orange) table.cell(dash, 0, 15, "Trend Alignment") table.cell(dash, 1, 15, str.tostring(alignment) + "%", text_color=color.white) table.cell(dash, 0, 16, "Bullish TF") table.cell(dash, 1, 16, str.tostring(bullCount), text_color=color.lime) table.cell(dash, 0, 17, "Bearish TF") table.cell(dash, 1, 17, str.tostring(bearCount), text_color=color.red) table.cell(dash, 0, 18, "Signal Status") table.cell(dash, 1, 18, signal, text_color=signal == "BUY SETUP" ? color.lime : signal == "SELL SETUP" ? color.red : color.orange) //──────────────────────────────────────────── // ALERTS //──────────────────────────────────────────── alertcondition( longSetup, title="SMART AI BUY SETUP", message="SMART AI: Multi-Timeframe BUY setup detected.") alertcondition( shortSetup, title="SMART AI SELL SETUP", message="SMART AI: Multi-Timeframe SELL setup detected.")
 Trad Shubahm·16h ago
 Bearish
 MGC1!
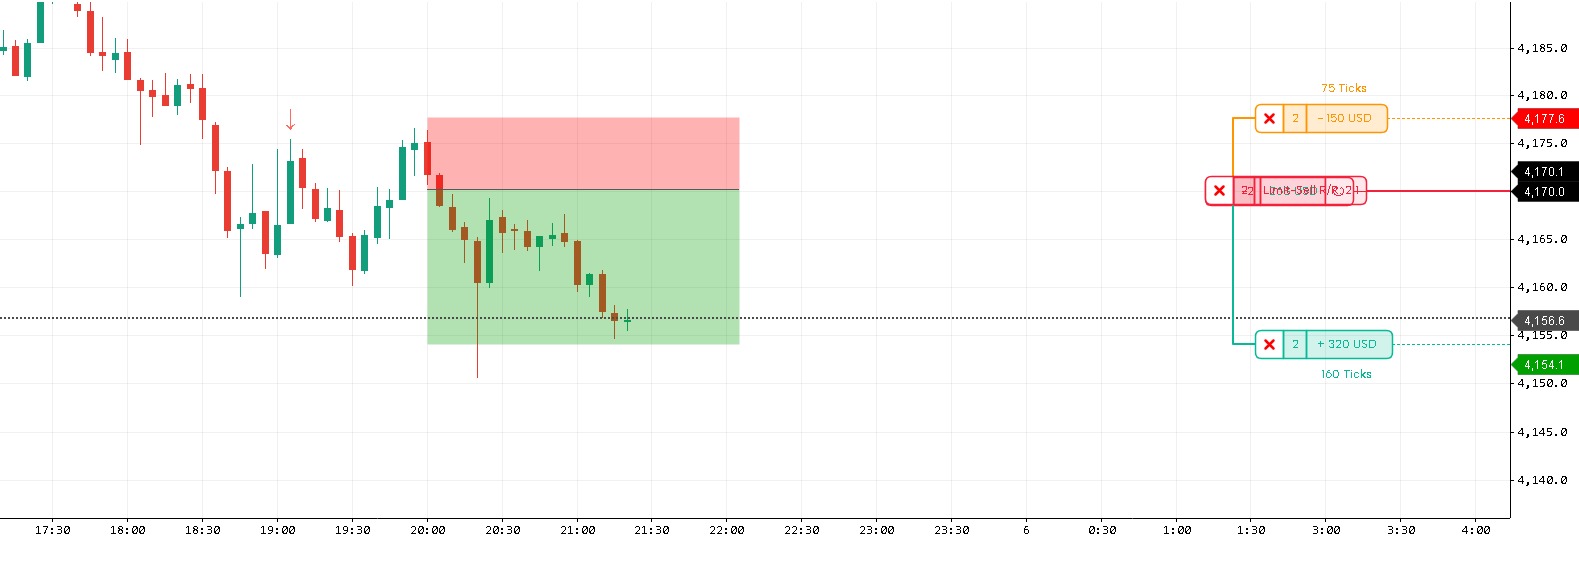
MGC1!gold is down
hiii i am from pakistan and i am using mmc concept by candelking19 if u want to trade or signel then tell me ignore this (jdhfgjdfgjkdfhgjdhfgjhdfjkgjdkfhgj)
 Abdullah Nasir·18h ago
 neutral
9+446446
TTHIS IS SUPOSE TO DXUBLE YOU PROFIT SO THAT YOU WILL MAKE A LOTJGGGGGGGGGGGGGGGGGGGGGGGGGGGGGGGGGGGGGGGGGGGGGGGGGGGGGGGGGGGGGGGGGGGGGGGGGGGGGGGGGGGGGGGGGGGGGGGGGGGGGGGGGGGGGGGGGGGGGGGGGGGGGGGGGGGGGGGGGGGGGGGGGGGGGGGGGGGGGGGGGGGGGGGGGGGGGGGGGGGGGGGGGGGGGGGGG
 fred Hammond·20h ago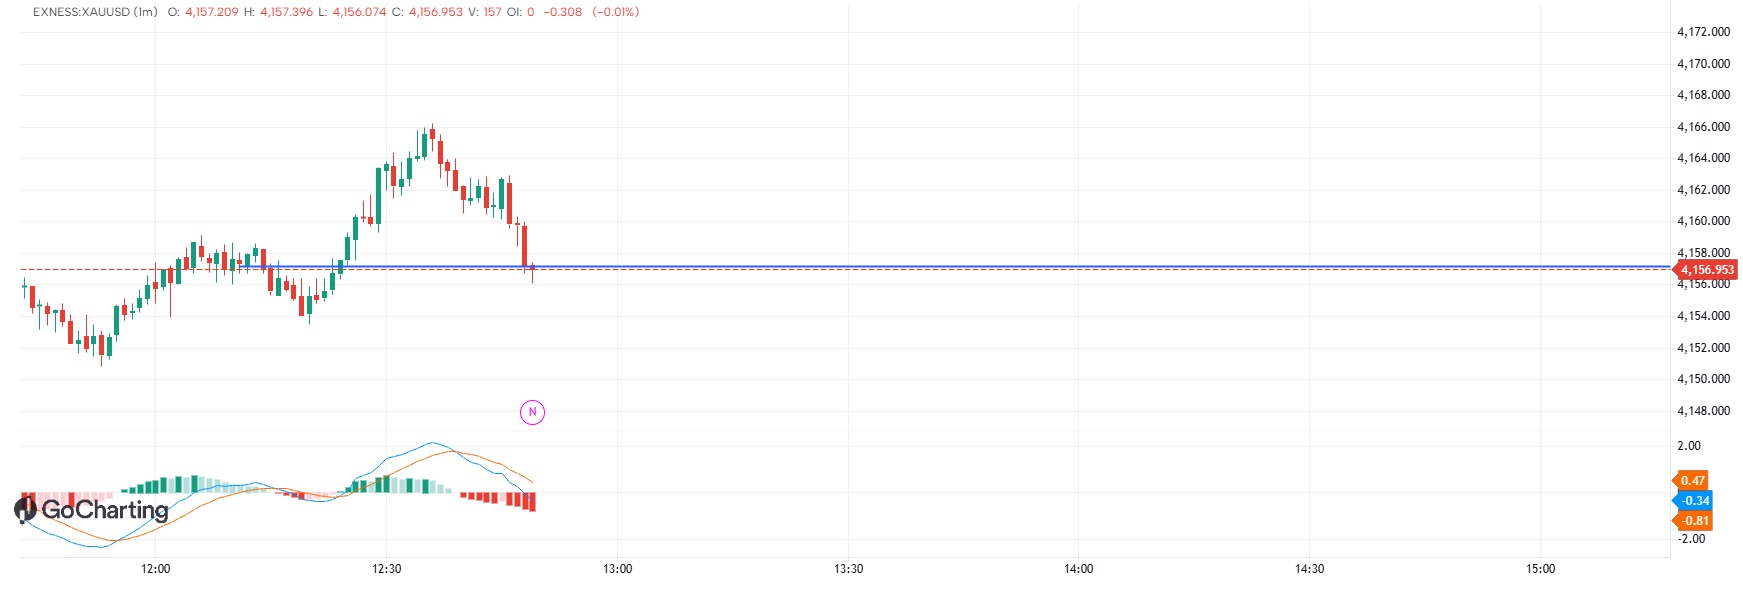
 XAUUSD
syntaxe Lipi
 Loupiloup·22h ago
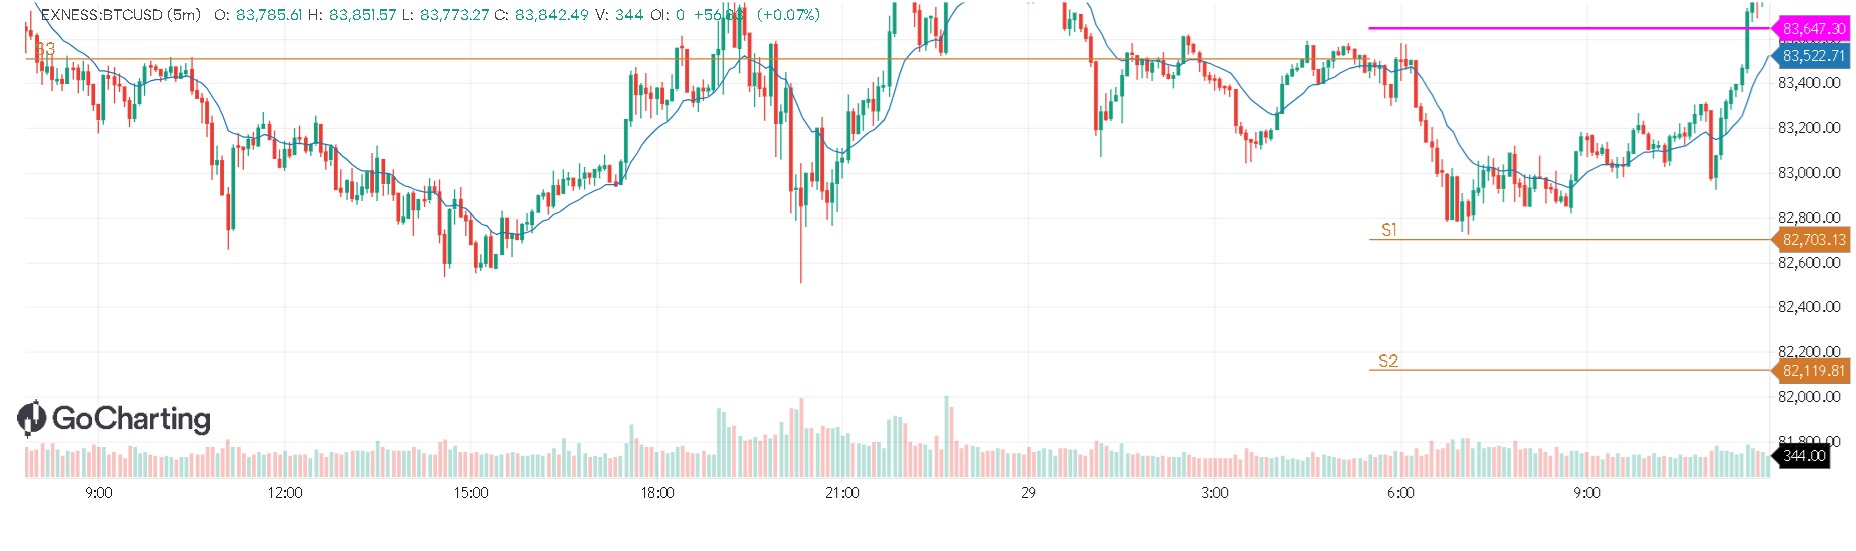 BTCUSD
FirstTest
test only
 Amardeep swami·1d ago
 BullishNIFTY
NIFTY : More Paint to come? | TRADING PLAN | 05-OCT-2026
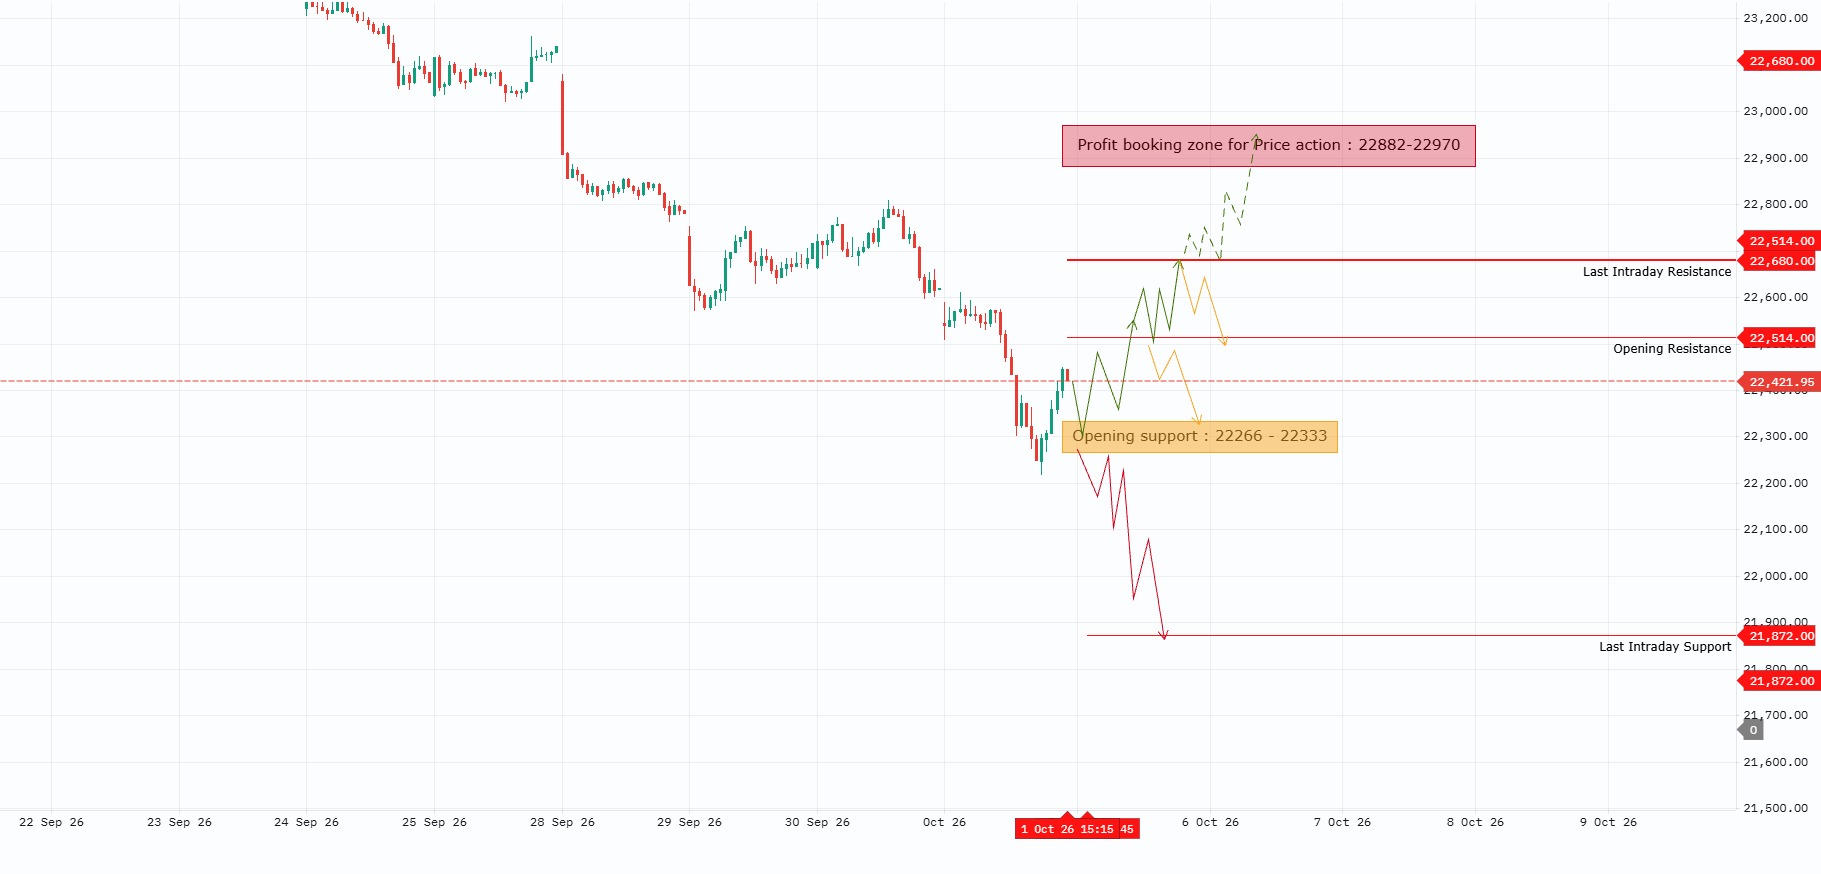
DAY BEFORE WEEKLY EXPIRY Previous Close: 22,445.60Timeframe: 15-MinuteMarket Structure: Bearish / CorrectiveIntraday Bias: Neutral to Bearish below 22,514 ━━━━━━━━━━━━━━━━━━ KEY LEVELS 🔴 22,883–22,970 → Profit Booking Zone🔴 22,680 → Last Intraday Resistance🟠 22,514 → Opening Resistance ⚫ 22,445.60 → Previous Close 🟢 22,266–22,333 → Opening Support Zone🔴 21,872 → Last Intraday Support🔴 21,520 → Major Extended Support ━━━━━━━━━━━━━━━━━━ TECHNICAL VIEW NIFTY remains in a bearish corrective structure after the sharp decline from the 23,000+ region. The immediate resistance is 22,514. This is the first important hurdle for any recovery. A sustained move above 22,514 can open the way toward 22,680. Above 22,680, the next major upside area is the 22,883–22,970 profit-booking zone. On the downside, 22,266–22,333 is the key opening support zone based on recent price structure and consolidation. A sustained breakdown below this zone can increase downside pressure toward 21,872, followed by 21,520. ━━━━━━━━━━━━━━━━━━ 100+ POINT GAP REFERENCES Previous Close: 22,445.60 100-Point Gap Up Reference: 22,545.60100-Point Gap Down Reference: 22,345.60 These are scenario references, NOT predictions. ━━━━━━━━━━━━━━━━━━ 🟢 GAP-UP OPENING – 100+ POINTS If NIFTY opens above approximately 22,546: • Sustained above 22,514 → Positive intraday momentum• Above 22,680 → Recovery can extend toward 22,883–22,970• Rejection near 22,680 → Profit booking/weakness can return toward 22,514 and 22,333 ⚠️ Do not chase the opening gap. Wait for price acceptance and confirmation above key resistance levels. ━━━━━━━━━━━━━━━━━━ 🟡 FLAT / NORMAL OPENING If NIFTY opens near the previous close: • Above 22,514 → Watch 22,680• Above 22,680 → 22,883–22,970• Below 22,333 → Weakness toward 21,872• Inside 22,266–22,333 → WAIT FOR CONFIRMATION The opening support zone should be treated as a decision area, not an automatic buying zone. ━━━━━━━━━━━━━━━━━━ 🔴 GAP-DOWN OPENING – 100+ POINTS If NIFTY opens below approximately 22,346: • Reclaim of 22,333 → Possible recovery toward 22,445–22,514• Sustained below 22,266 → Bearish continuation becomes more likely• Below the support zone → 21,872 becomes the next important downside reference• Decisive break below 21,872 → 21,520 becomes the extended downside level ━━━━━━━━━━━━━━━━━━ DAY-BEFORE-EXPIRY APPROACH ✔ Expect increased volatility as weekly expiry approaches.✔ Wait for the first 15–30 minutes before taking aggressive directional trades.✔ Use 15-minute closing confirmation around key levels.✔ Avoid chasing gap openings.✔ Avoid aggressive option buying inside 22,266–22,333 without confirmation.✔ Keep position size controlled and define the invalidation level before entry.✔ Never average a losing options position. ━━━━━━━━━━━━━━━━━━ KEY MARKET MAP 🟢 ABOVE 22,680Recovery Strength → 22,883–22,970 🟠 22,514–22,680Resistance / Decision Zone 🟢 22,266–22,333Opening Support Zone 🔴 BELOW 22,266Weakness → 21,872 → 21,520 ━━━━━━━━━━━━━━━━━━ SUMMARY The key battle for 05-Oct is between the 22,266–22,333 support zone and 22,514–22,680 resistance zone. A sustained breakout above 22,680 can trigger a recovery toward 22,883–22,970. A sustained breakdown below 22,266 can expose 21,872, followed by 21,520. With weekly expiry approaching, the focus should remain on confirmed price action rather than predicting the opening direction. ━━━━━━━━━━━━━━━━━━ DISCLAIMER This analysis is for educational and informational purposes only. I am NOT a SEBI registered analyst. This post is not investment advice or a recommendation to buy or sell any security or derivative. Trading in F&O involves substantial risk. Please conduct your own analysis and follow appropriate risk management. #NIFTY50 #NIFTY #WeeklyExpiry #TradingPlan #IntradayTrading #TechnicalAnalysis #PriceAction #OptionsTrading #LiveTradingBox
 Live Trading Box·1d ago
 neutralNIFTY
NIFTY – INTRADAY TRADING PLAN | 01-OCT-2026
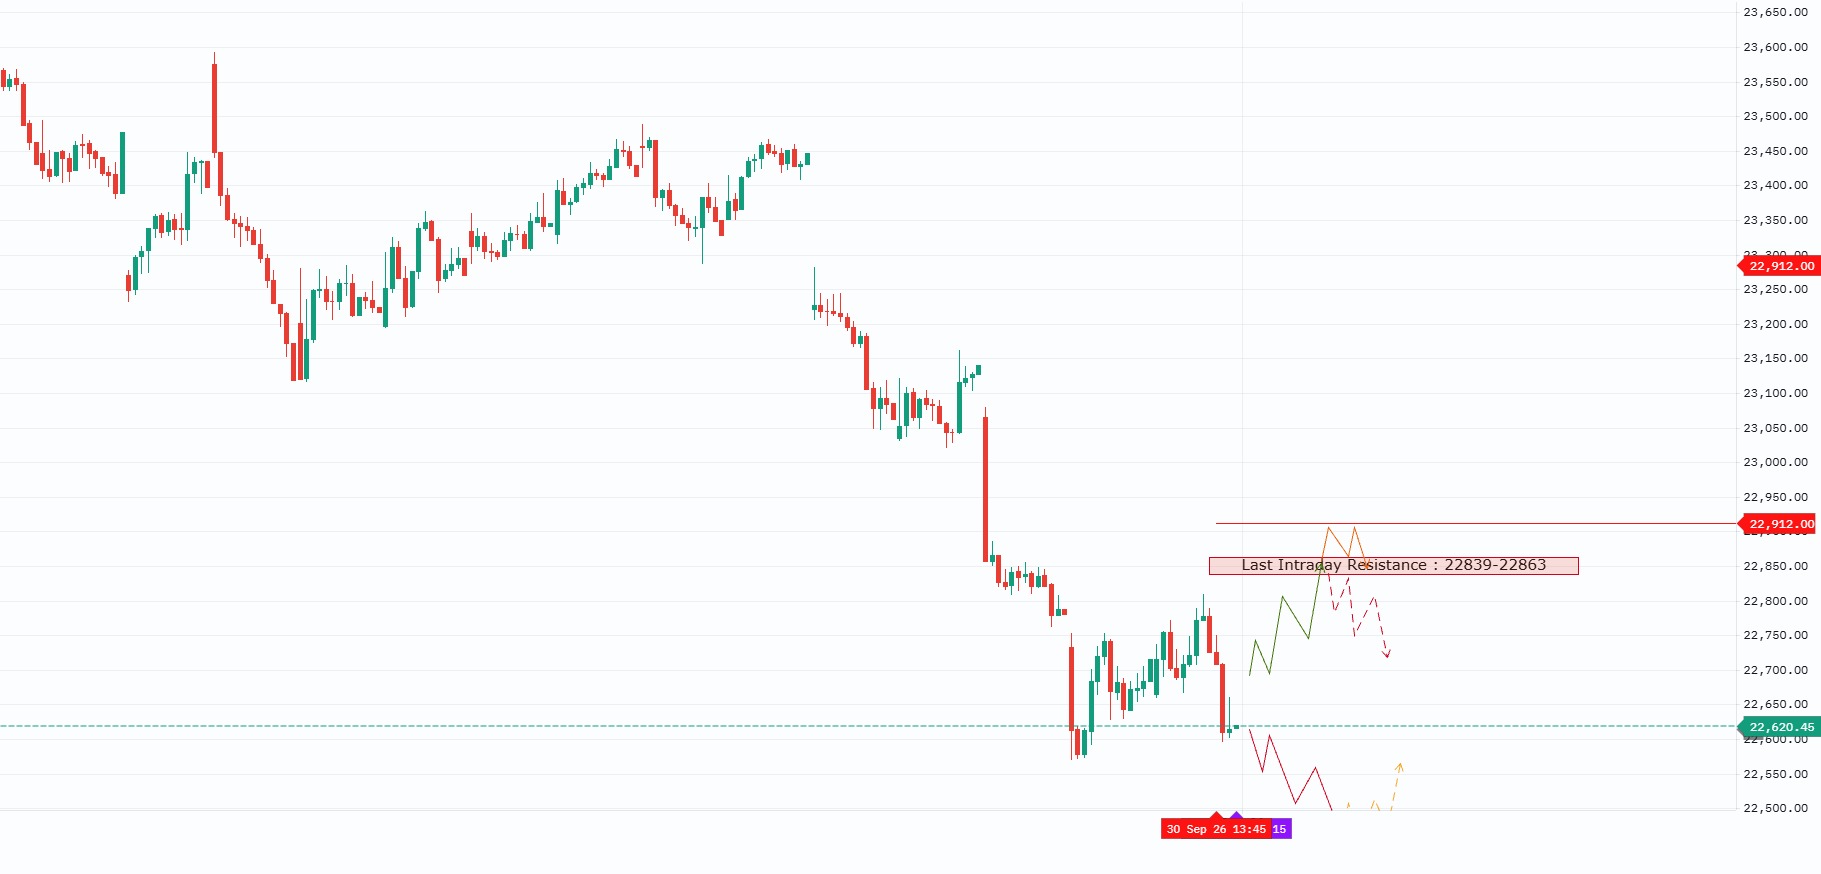
Previous Close: 22,614.30Timeframe: 15-MinuteMarket Structure: Bearish, with major support below ━━━━━━━━━━━━━━━━━━ KEY LEVELS 🔴 22,912 – Last Intraday Resistance 🔴 22,839–22,863 – Opening / Last Intraday Resistance Zone 🟠 22,620–22,690 – NO-TRADE / DECISION ZONE 🔵 22,460 – Major Intraday Support 🔵 22,202 – Extended Downside Support ━━━━━━━━━━━━━━━━━━ TECHNICAL VIEW NIFTY is trading around 22,614 after a sharp decline followed by consolidation. The broader 22,603–22,852 region has acted as an important historical support/consolidation area. However, price is currently positioned near the lower portion of this region, keeping the immediate structure cautious. The 22,620–22,690 area is the key decision zone for the session. Price action inside this range can remain volatile and may produce false breakouts or breakdowns. Confirmation is therefore important before taking a directional trade. The 22,839–22,863 zone represents immediate overhead supply/resistance. A sustained breakout and acceptance above this zone can indicate improving short-term strength. Above 22,863, the next important resistance/target reference is 22,912. On the downside, 22,460 is the major intraday support. A sustained breakdown below this level can expose the next support at 22,202. ━━━━━━━━━━━━━━━━━━ 100+ POINT GAP REFERENCES Previous Close: 22,614.30 100-Point Gap Up Reference: 22,714.30 100-Point Gap Down Reference: 22,514.30 These are scenario references only and are not predictions. ━━━━━━━━━━━━━━━━━━ 🟢 GAP-UP OPENING – 100+ POINTS If NIFTY opens above approximately 22,714: • Above 22,714 but below 22,839 → Wait for confirmation. • Sustained move above 22,839–22,863 → Recovery can extend toward 22,912. • Rejection from 22,839–22,863 → Weakness can return toward 22,690 and 22,620. Do not chase the initial gap. The reaction around the resistance zone is more important than the opening candle itself. ━━━━━━━━━━━━━━━━━━ 🟡 FLAT / NORMAL OPENING If NIFTY opens near the previous close: • Above 22,690 → Watch 22,839–22,863. • Sustained above 22,863 → 22,912 becomes the next reference. • Below 22,620 → Watch 22,460. • Inside 22,620–22,690 → NO TRADE / WAIT FOR CONFIRMATION. The 22,620–22,690 range should be treated as a decision area rather than an aggressive entry zone. ━━━━━━━━━━━━━━━━━━ 🔴 GAP-DOWN OPENING – 100+ POINTS If NIFTY opens below approximately 22,514: • Reclaim of 22,460 → Recovery can develop toward 22,620. • Sustained trading below 22,460 → Downside can extend toward 22,202. • Avoid chasing the first gap-down candle. Prefer a pullback, retest, or confirmed breakdown. ━━━━━━━━━━━━━━━━━━ TRADE MANAGEMENT ✔ Wait for the first 15–30 minutes where possible. ✔ Use 15-minute closing confirmation for important breakouts and breakdowns. ✔ Avoid aggressive trades inside the 22,620–22,690 decision zone. ✔ Do not chase large gap openings. ✔ Define the invalidation/stop-loss level before entering. ✔ For options trading, keep position size controlled because option premiums can move significantly faster than the underlying index. ━━━━━━━━━━━━━━━━━━ KEY MARKET MAP Above 22,863→ Recovery Strength→ 22,912 22,620–22,690→ NO-TRADE / DECISION ZONE→ Wait for confirmation Below 22,460→ Downside Risk→ 22,202 ━━━━━━━━━━━━━━━━━━ SUMMARY The key battle for 01-Oct-2026 is around the 22,620–22,690 decision zone. A sustained breakout above 22,839–22,863 can improve short-term momentum and bring 22,912 into focus. A sustained breakdown below 22,460 can increase downside pressure toward 22,202. The approach for the session is to react to confirmed price action around the marked levels rather than predict the opening direction. ━━━━━━━━━━━━━━━━━━ DISCLAIMER This analysis is for educational and informational purposes only. I am not a SEBI registered analyst. This post is not investment advice or a recommendation to buy or sell any security or derivative. Trading in Futures & Options involves substantial risk. Please conduct your own analysis and follow appropriate risk management. #NIFTY50 #NIFTY #TradingPlan #IntradayTrading #TechnicalAnalysis #PriceAction #OptionsTrading #LiveTradingBox
Live Trading Box·5d ago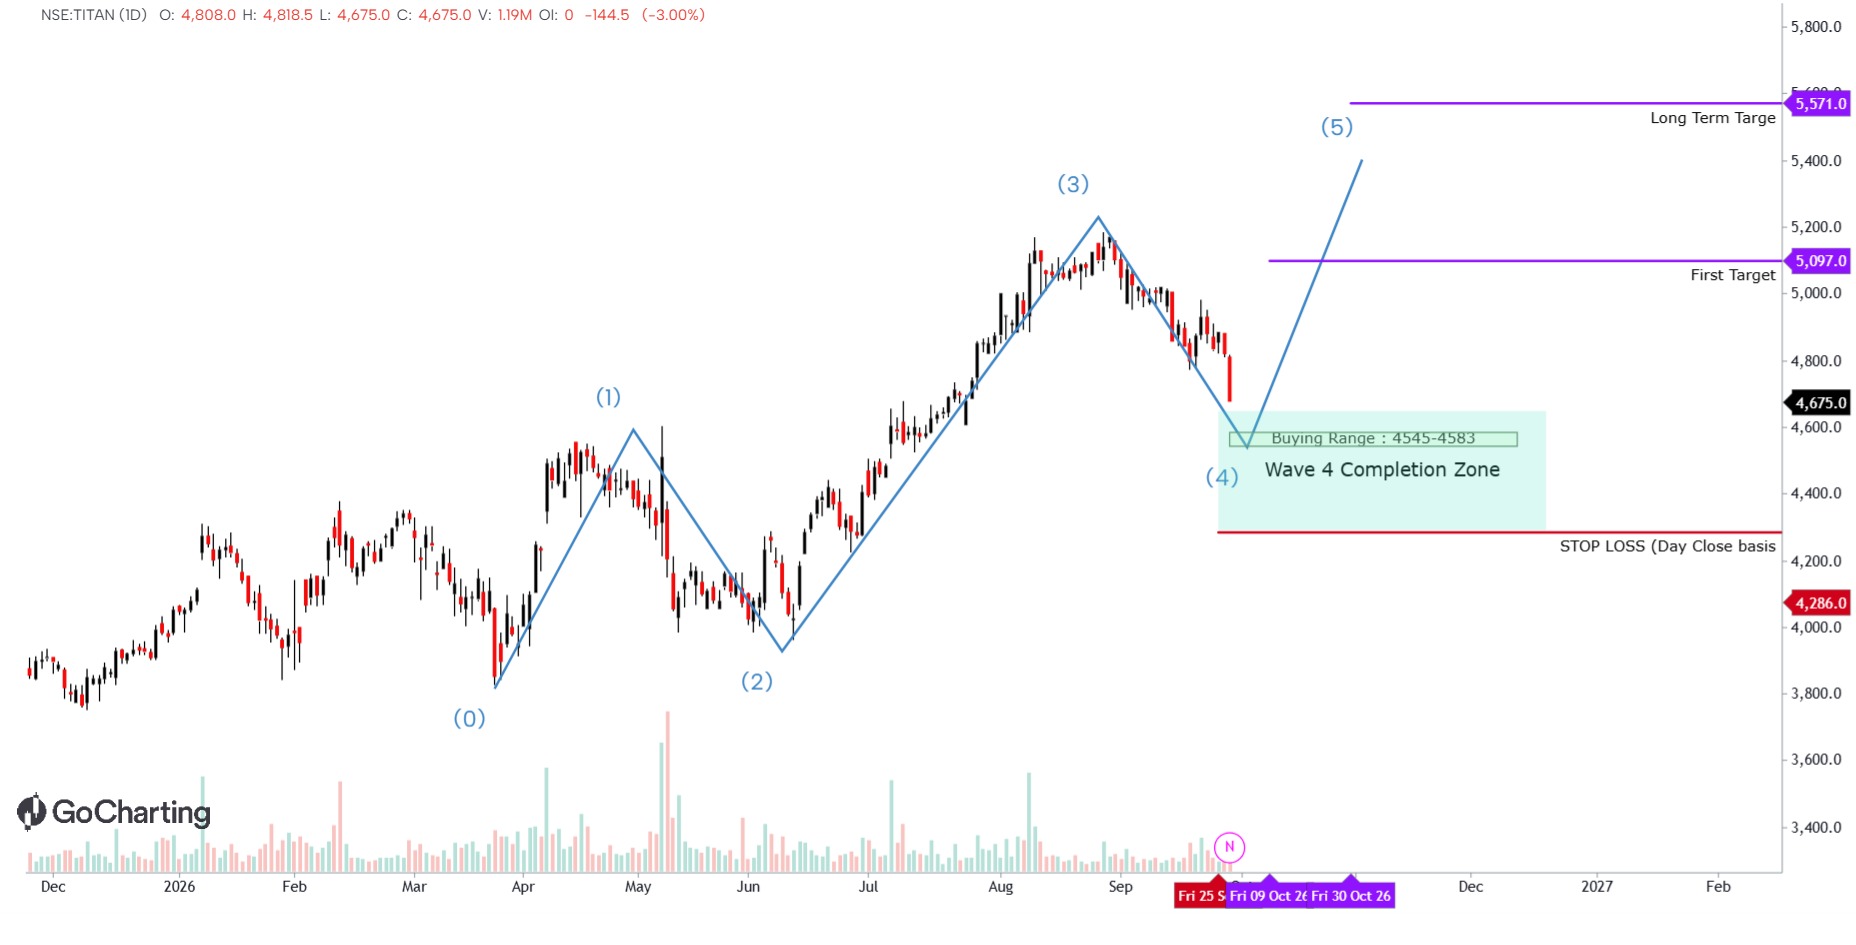 BullishTITAN
TITAN COMPANY LTD. – TECHNICAL ANALYSIS
📊 📅 Timeframe: Daily (1D)💰 CMP: ₹4,675 🔹 SETUP: POTENTIAL WAVE 4 COMPLETION Titan is currently undergoing a corrective phase after a strong Wave 3 advance toward the ₹5,200 zone. The current price action suggests a potential Wave 4 completion near the marked buying zone. 🟢 BUYING RANGE: ₹4,545 – ₹4,583 This is the key zone to watch for a possible bullish reversal. Look for confirmation through:• Bullish reversal candle• Higher-low formation• Momentum recovery• Breakout of the immediate corrective structure 📈 ELLIOTT WAVE STRUCTURE Wave 0 → ₹3,850 areaWave 1 → ₹4,550–₹4,600Wave 2 → ₹3,950 areaWave 3 → ₹5,200+Wave 4 → Current correctionWave 5 → Potential next upside move 🎯 UPSIDE LEVELS 1️⃣ First Target: ₹5,097 2️⃣ Long-Term Target: ₹5,571 If the Wave 4 correction completes successfully and price resumes the larger impulsive structure, these are the major upside levels marked on the chart. 🔴 RISK / INVALIDATION Stop Loss: ₹4,286⚠️ Daily Closing Basis A decisive daily close below ₹4,286 would invalidate the current Wave 4 completion setup and require reassessment. 📌 KEY LEVELS 🟢 Buying Zone: ₹4,545–₹4,583⚫ CMP: ₹4,675🎯 Target 1: ₹5,097🎯 Target 2: ₹5,571🔴 SL: ₹4,286 (Daily Close) 🔎 WHAT TO WATCH? Bullish Scenario:₹4,545–₹4,583 holds➡️ Bullish reversal➡️ Higher Low➡️ Corrective structure breakout➡️ ₹5,097➡️ ₹5,571 Bearish Scenario:❌ Failure to hold ₹4,545–₹4,583➡️ Deeper correction possible ❌ Daily close below ₹4,286➡️ Current Wave 4 setup invalidated 📢 IMPORTANT The ₹4,545–₹4,583 zone is the key decision area. Do not treat the buying zone as an automatic entry; wait for price confirmation. ⚠️ DISCLAIMER:This analysis is for educational and informational purposes only and is not investment advice. I am not a SEBI registered analyst. Please conduct your own research and follow proper risk management before taking any trading or investment decision. #TITAN #TITANCOMPANY #NSE #StockMarket #TechnicalAnalysis #ElliottWave #SwingTrading #IndianStockMarket #LiveTradingBox
Live Trading Box·6d ago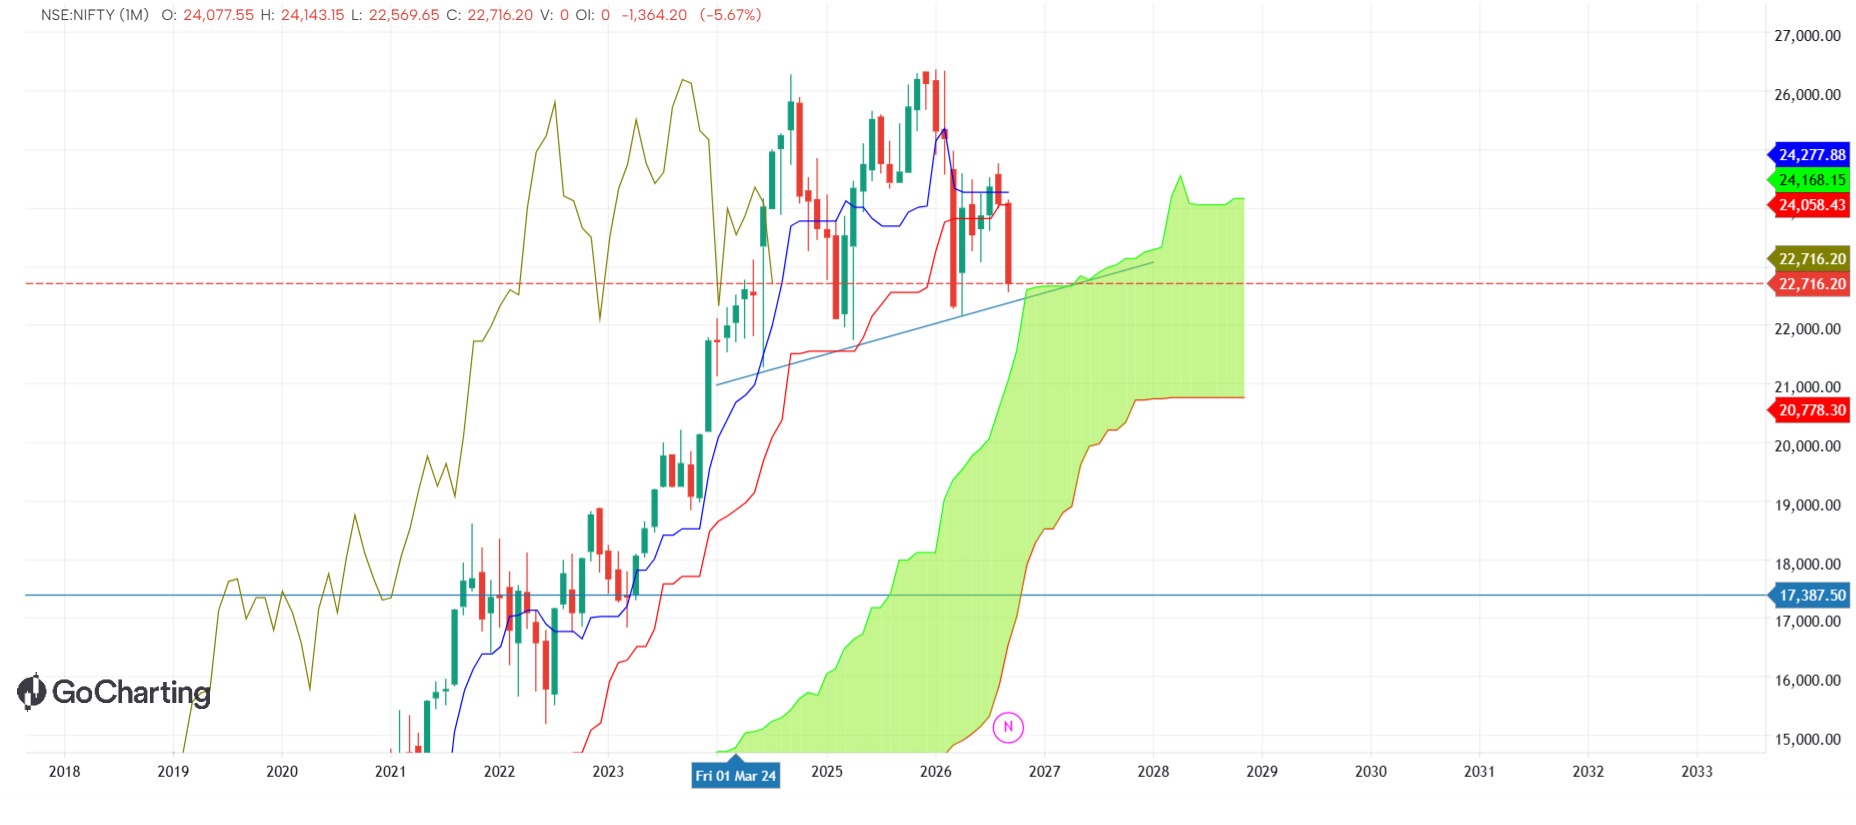 BearishNIFTY
NIFTY 1M, testing trendline
Bearish target 17k a possibility after a multi year consolidation top. Unsettling pop the bubble analogy. Invalidation is price bouncing off Senkou-span-A.
 [email protected]·6d ago
 BullishNIFTY
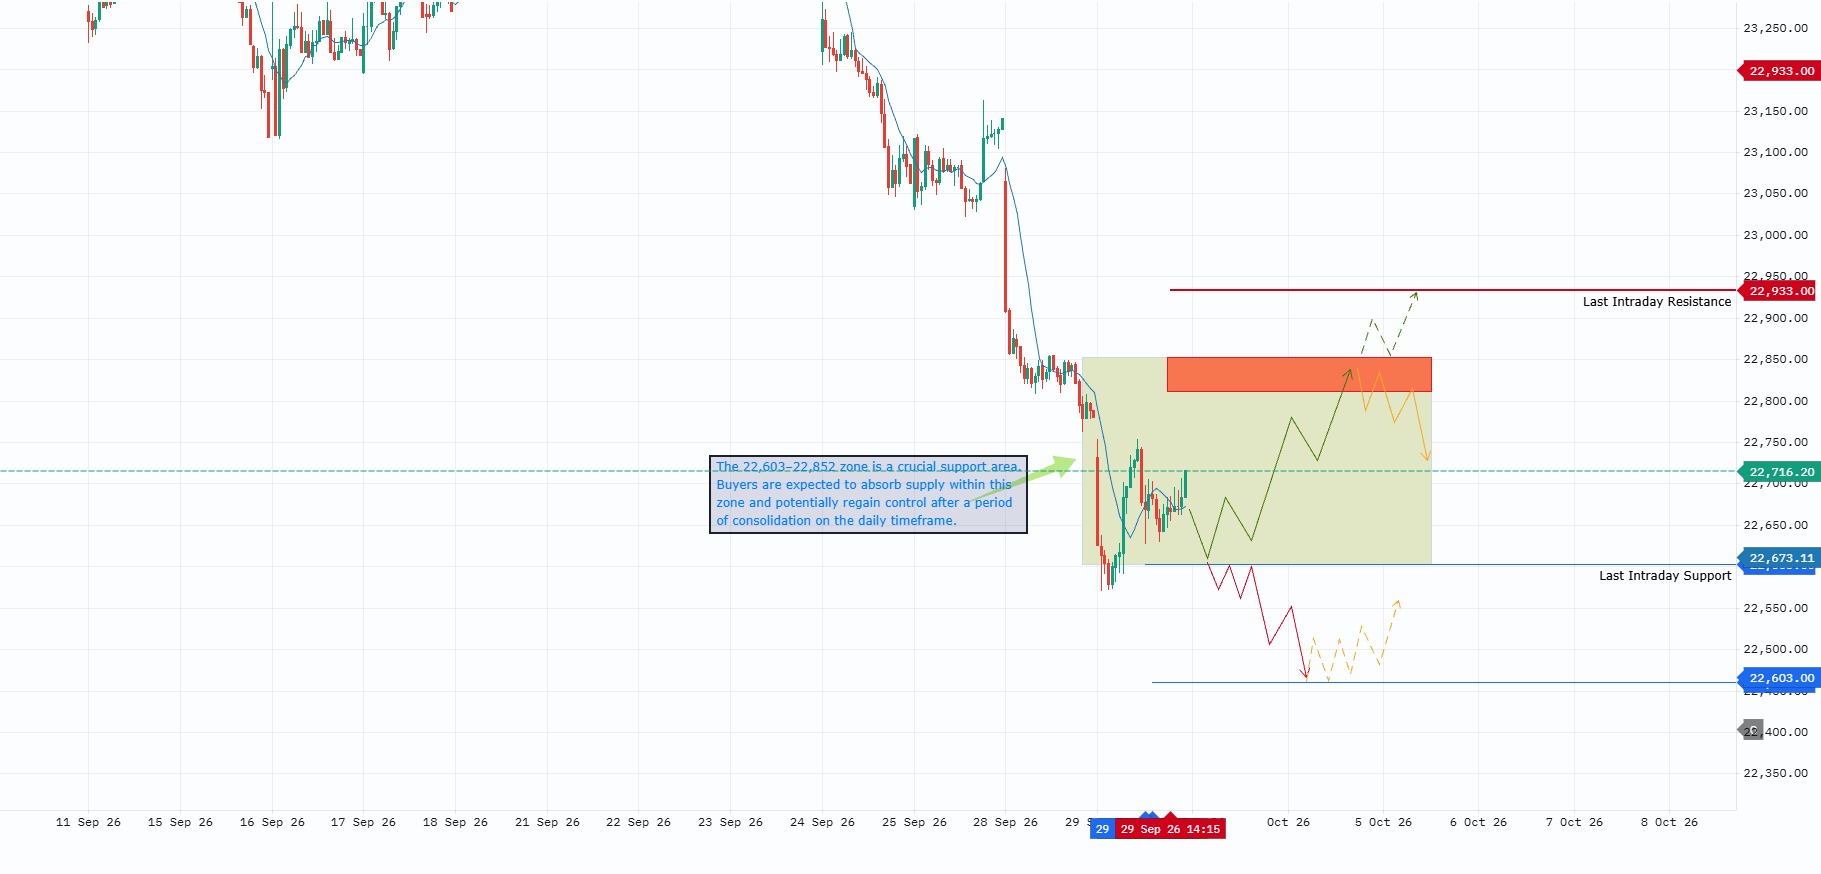
NIFTY – INTRADAY TRADING PLAN | 30 SEP 2026
Previous Close: 22,680.90Timeframe: 15-MinuteMarket Structure: Bearish, with stabilization attempt near major support. ━━━━━━━━━━━━━━━━━━━━ KEY LEVELS 🔴 Last Intraday Resistance: 22,933 🟠 Opening Resistance Zone: 22,811–22,852 ⚫ Previous Close: 22,680.90 🔵 Last Intraday Support: 22,603🔵 Extended Downside Support: 22,460 ━━━━━━━━━━━━━━━━━━━━ TECHNICAL VIEW NIFTY has seen a sharp decline from the 23,200+ region and is now consolidating around the 22,603–22,852 area. The chart identifies this as an important support/consolidation zone where buyers may attempt to absorb selling pressure. 22,603 is the key downside reference. Holding above this level can support a recovery toward 22,811–22,852. A sustained breakout above 22,852 can bring 22,933 into focus. A decisive breakdown below 22,603 can expose 22,460. ━━━━━━━━━━━━━━━━━━━━ 100+ POINT GAP REFERENCES Previous Close: 22,680.90 Gap Up Reference: 22,780.90Gap Down Reference: 22,580.90 These are scenario references, not predictions. ━━━━━━━━━━━━━━━━━━━━ 🟢 GAP-UP OPENING – 100+ POINTS If NIFTY opens above approximately 22,781: • Sustained above 22,811–22,852 → recovery toward 22,933. • Rejection from 22,811–22,852 → weakness can return toward 22,680/22,603. • Sustained above 22,933 → further improvement in short-term structure. ━━━━━━━━━━━━━━━━━━━━ 🟡 FLAT / NORMAL OPENING If NIFTY opens near the previous close: • Above 22,852 → 22,933• Below 22,603 → 22,460• Between 22,603–22,852 → WAIT FOR CONFIRMATION Avoid aggressive trades while price remains inside the consolidation zone. ━━━━━━━━━━━━━━━━━━━━ 🔴 GAP-DOWN OPENING – 100+ POINTS If NIFTY opens below approximately 22,581: • Reclaim 22,603 → recovery can target 22,680 → 22,811. • Sustained below 22,603 → downside focus shifts toward 22,460. Avoid chasing the first gap candle. Wait for price acceptance or rejection around 22,603. ━━━━━━━━━━━━━━━━━━━━ TRADING APPROACH ✔ Wait for the first 15–30 minutes where possible.✔ Look for 15-minute closing confirmation at key levels.✔ Avoid aggressive trades inside 22,603–22,852.✔ Do not chase gap openings.✔ Define the invalidation level before entering.✔ Control option position size because premiums can move rapidly. ━━━━━━━━━━━━━━━━━━━━ KEY MARKET MAP Above 22,852 → Recovery Strength → 22,933 22,603–22,852 → Decision / Consolidation Zone Below 22,603 → Weakness → 22,460 ━━━━━━━━━━━━━━━━━━━━ SUMMARY The key level for 30-Sep is 22,603. If support holds and NIFTY reclaims 22,811–22,852, recovery can extend toward 22,933. If 22,603 breaks decisively, the next important downside reference is 22,460. Focus on price reaction and confirmation at the marked levels rather than predicting the opening direction. ━━━━━━━━━━━━━━━━━━━━ DISCLAIMER: This analysis is for educational and informational purposes only. I am not a SEBI registered analyst. This is not investment advice or a recommendation to buy or sell any security or derivative. Trading in F&O involves substantial risk. Please conduct your own analysis and follow appropriate risk management. #NIFTY50 #NIFTY #TradingPlan #IntradayTrading #TechnicalAnalysis #PriceAction #OptionsTrading #GoCharting #LiveTradingBox
Live Trading Box·6d ago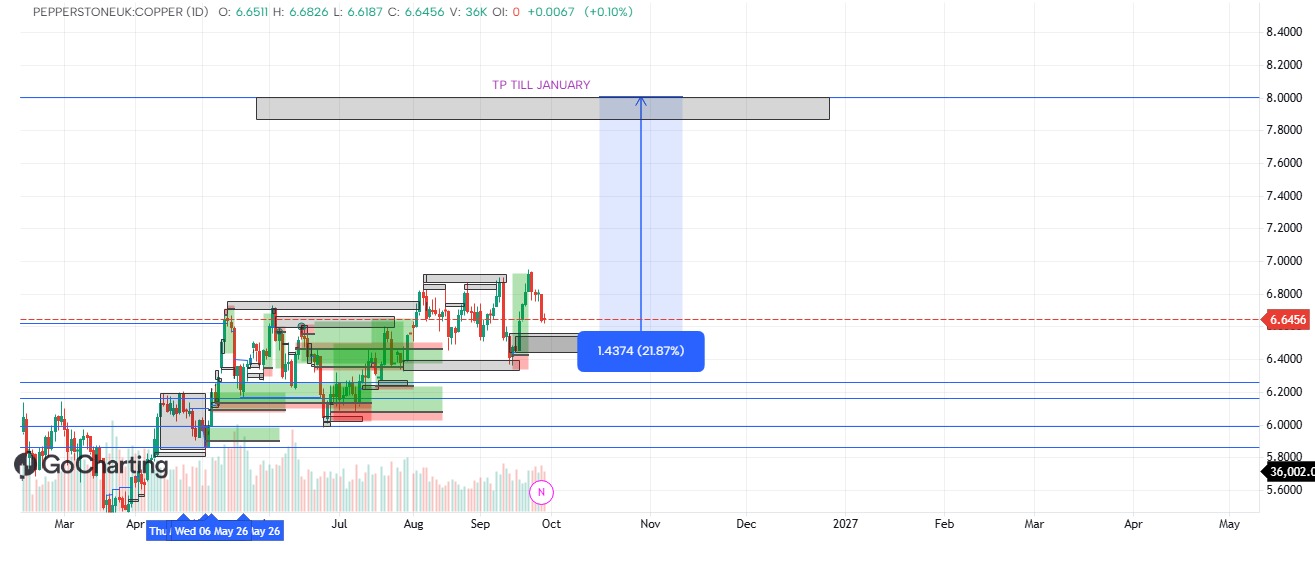 COPPER
COPPER NEW HIGH EXP from 02/10/2026
You will see a new ath in next 20-30day my last of copper is 8$ . i known this is unxpected but it will due to silver and gold ath 💰 contact me on telegram fr more detail - tradephile1
 Ayutrade·6d ago
 Bearish
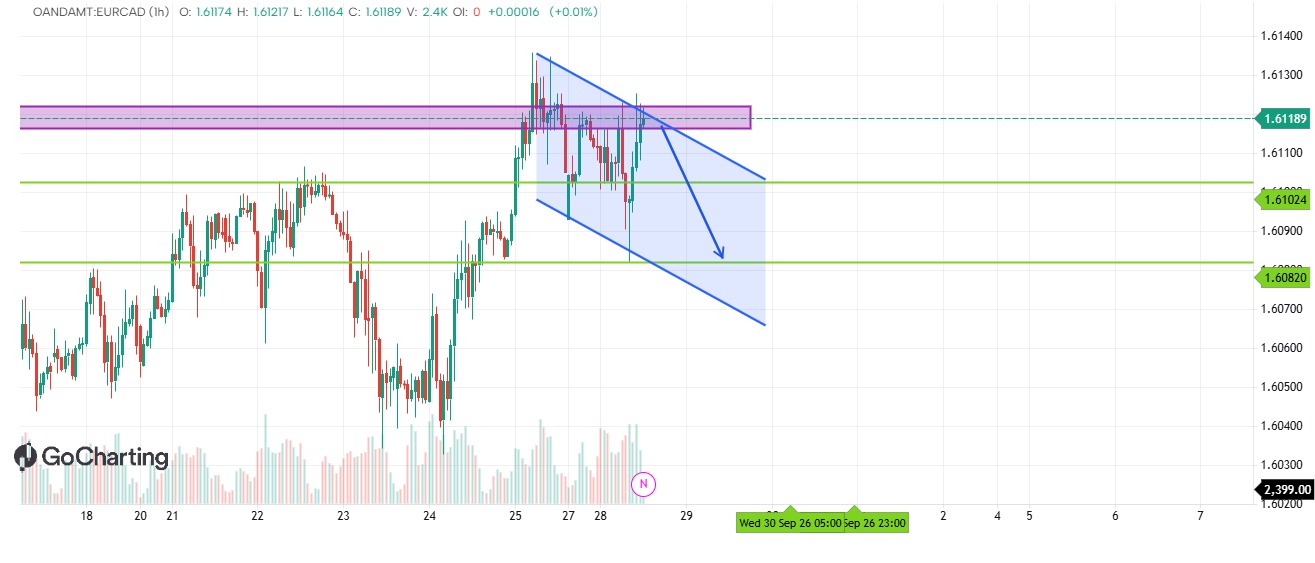
veo canal
posible nacimiento de una nueva tendencia menor a la baja, buen rechazo a la zona acumulativa superior, por lo que espero como minimo un velazo a la baja
 Bruno Santiago·1w ago
 BearishAUDUSD
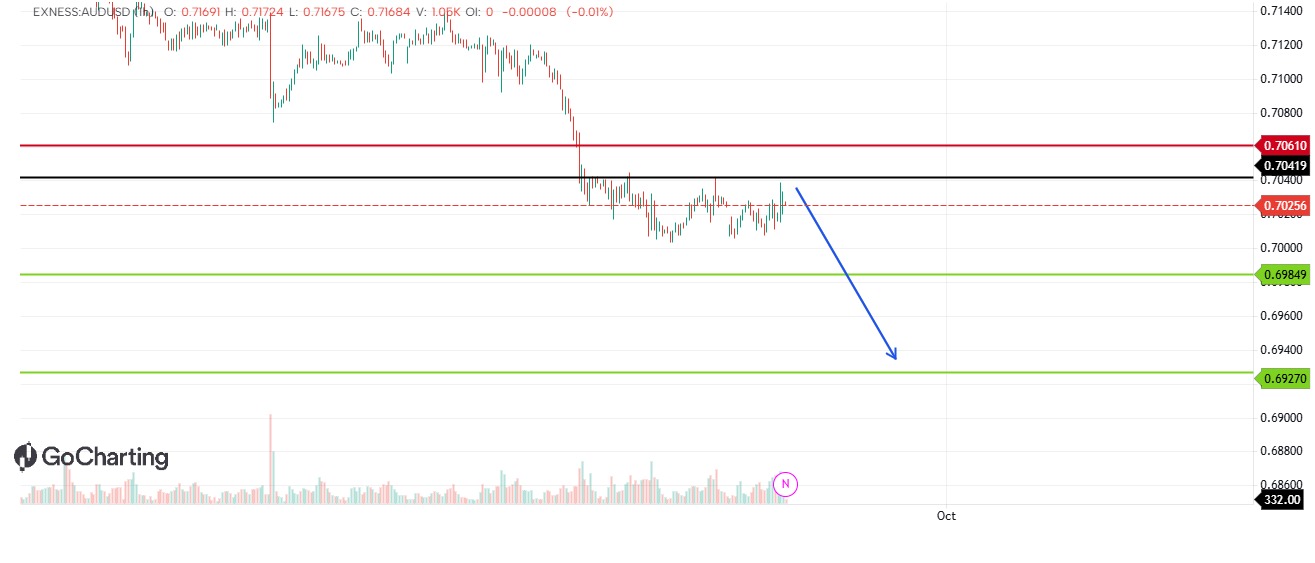
soporte
a por el soporte, sin embargo creo que es una falsa salida al alza, pienso que buscará su minimo siguiente, esperaría que liquidará compras continuando a la baja
Bruno Santiago·1w ago neutralXAUUSD
sillenttrader_zar market killer
QUAD XAU Quant is a mathematical, multi-factor day-trading strategy designed specifically for Gold (XAUUSD). Instead of relying on a single indicator, the system combines four core dimensions of market analysis: Market Structure, Volume, Volatility, and Price Location. The strategy uses tools such as VWAP, Volume/POC, EMA structure, ATR, Bollinger Bands, Fibonacci levels, liquidity sweeps, session ranges, and momentum to identify areas where multiple independent conditions align. At the centre of the system is a Confluence Engine that converts these conditions into a quantitative score. Rather than generating signals from one indicator, QUAD XAU Quant waits for several confirmations to agree before identifying a potential BUY or SELL setup. The system is designed around a simple principle: Structure → Volume → Volatility → Location → Confluence → Signal Its objective is to filter market noise, identify high-confluence intraday setups, and provide structured entries, dynamic ATR-based risk levels, and predefined profit targets. QUAD XAU Quant is not designed to predict every market move. It is a rule-based framework designed to help traders make decisions based on measurable market conditions rather than emotion or guesswork.
 Max Wheel·1w ago
 XAUUSD
Silenttrade_ZAR indicator
Max Wheel·1w ago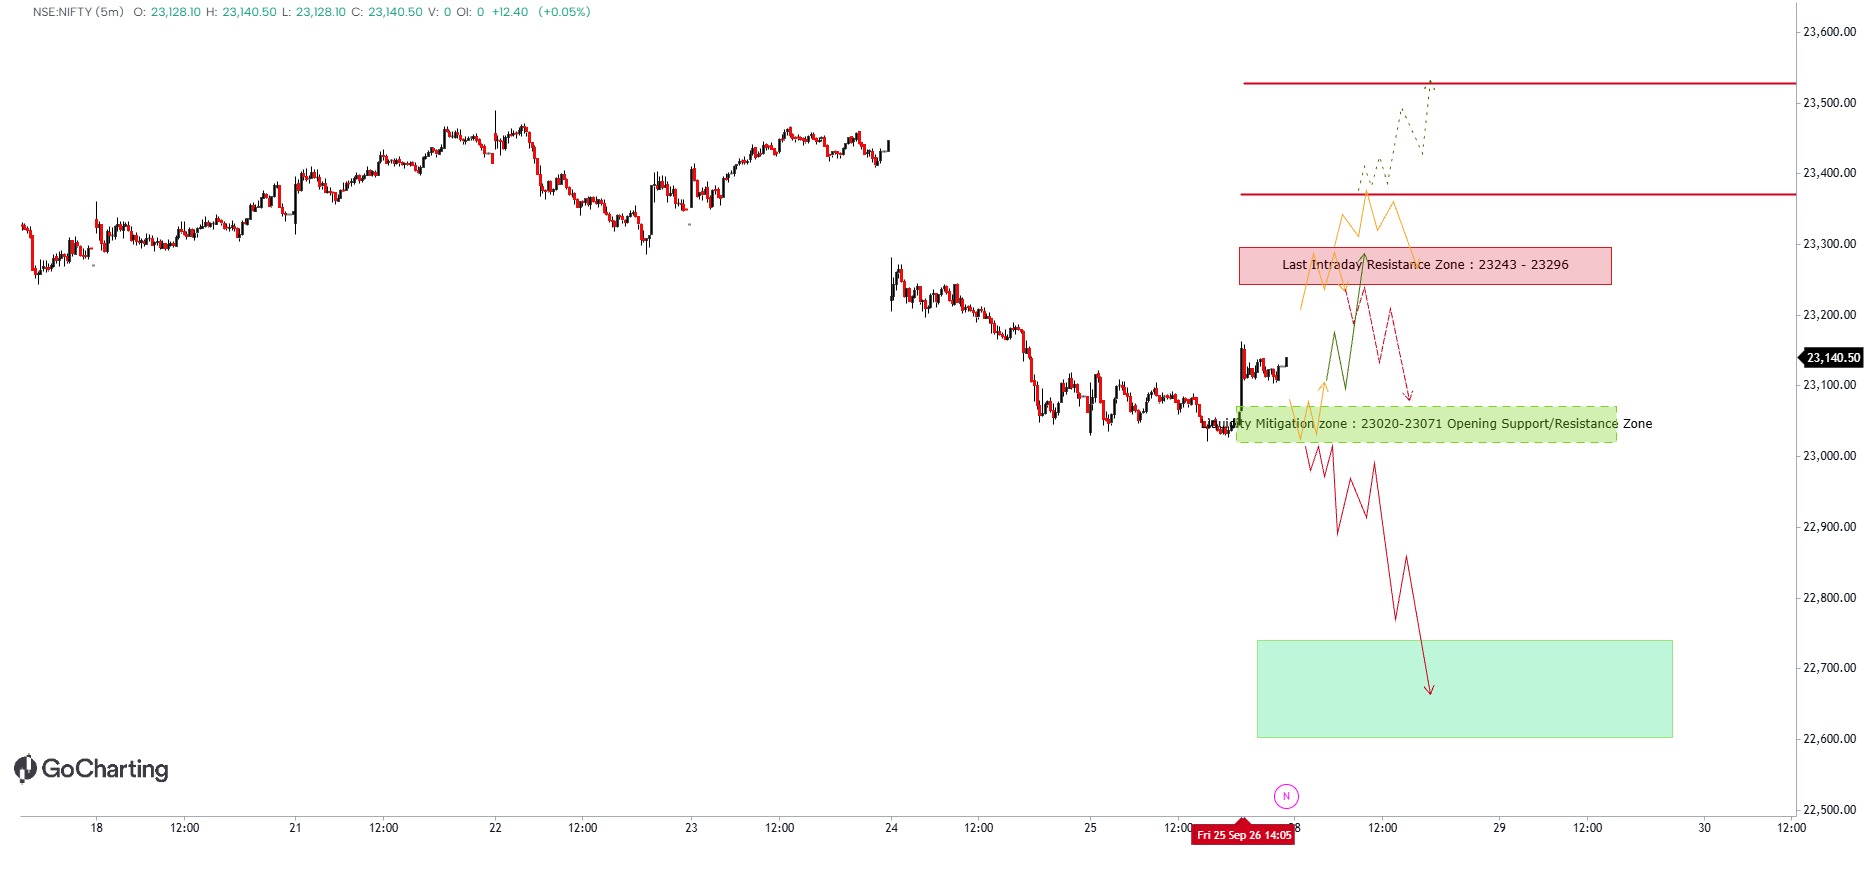 neutralNIFTY
NIFTY 50 INTRADAY TRADING PLAN – 28 SEP 2026
Previous Close: 23,127.60Timeframe: 15-Minute Market Structure: Bearish / CorrectiveIntraday Bias: Neutral to Bearish below 23,243 ━━━━━━━━━━━━━━━━━━━━ KEY LEVELS 🔴 Major Resistance: 23,527🔴 Intermediate Resistance: 23,371🔴 Last Intraday Resistance: 23,296🟠 Opening Resistance Zone: 23,243–23,296 ⚫ Previous Close: 23,127.60 🟢 Opening Support / Liquidity Zone: 23,020–23,071🔻 Major Lower Liquidity Zone: 22,602–22,739 ━━━━━━━━━━━━━━━━━━━━ WHY THESE LEVELS MATTER 23,243–23,296This is the immediate supply/resistance area visible on the 15-minute structure. Sustained acceptance above 23,296 can indicate that the immediate bearish pressure is weakening. 23,020–23,071This is the key liquidity-mitigation and support area formed around recent price activity. It is also the main decision zone for Monday. 22,602–22,739This is the deeper liquidity zone marked on the chart. A sustained breakdown below 23,020 can bring this area into focus. ━━━━━━━━━━━━━━━━━━━━ OPENING SCENARIOS 🟢 GAP UP – 100+ POINTS 100-point gap-up reference: 23,227.60 If NIFTY opens above 23,228: • Above 23,243 → watch 23,296• Sustained above 23,296 → 23,371 → 23,527• Rejection from 23,243–23,296 → avoid chasing longs and wait for confirmation. 🟡 FLAT / NORMAL OPEN Reference range: 23,028–23,228 Wait for the first 15–30 minutes. • Above 23,243 → strength toward 23,296• Below 23,071 → weakness toward 23,020• Inside 23,020–23,071 → NO-TRADE / WAIT FOR CONFIRMATION 🔴 GAP DOWN – 100+ POINTS 100-point gap-down reference: 23,027.60 If NIFTY opens below 23,028: • Reclaim 23,020–23,071 → recovery can target 23,243• Sustained below 23,020 → downside focus shifts toward 22,739–22,602 ━━━━━━━━━━━━━━━━━━━━ TRADING APPROACH ✔ Don't trade the opening gap blindly.✔ Wait for price acceptance/rejection at key levels.✔ Prefer 15-minute closing confirmation for breakouts and breakdowns.✔ Avoid aggressive option buying inside the 23,020–23,071 decision zone.✔ Keep risk strictly controlled and avoid averaging losing trades. ━━━━━━━━━━━━━━━━━━━━ KEY MARKET MAP Above 23,296 → Strength 23,020–23,296 → Decision / Range Zone Below 23,020 → Weakness ━━━━━━━━━━━━━━━━━━━━ SUMMARY The key battle for Monday is between 23,020–23,071 support and 23,243–23,296 resistance. A sustained move above 23,296 can open the way toward 23,371 and 23,527. A sustained breakdown below 23,020 can expose 22,739–22,602. The focus should be on the market's reaction to these levels rather than predicting the opening direction. DISCLAIMER This analysis is for educational and informational purposes only. I am not a SEBI registered analyst. This is not investment advice or a recommendation to buy or sell any security or derivative. Trading in F&O involves substantial risk. Please conduct your own analysis and follow proper risk management. #NIFTY50 #NIFTY #TradingPlan #IntradayTrading #TechnicalAnalysis #PriceAction #OptionsTrading #GoCharting #LiveTradingBox
Live Trading Box·1w ago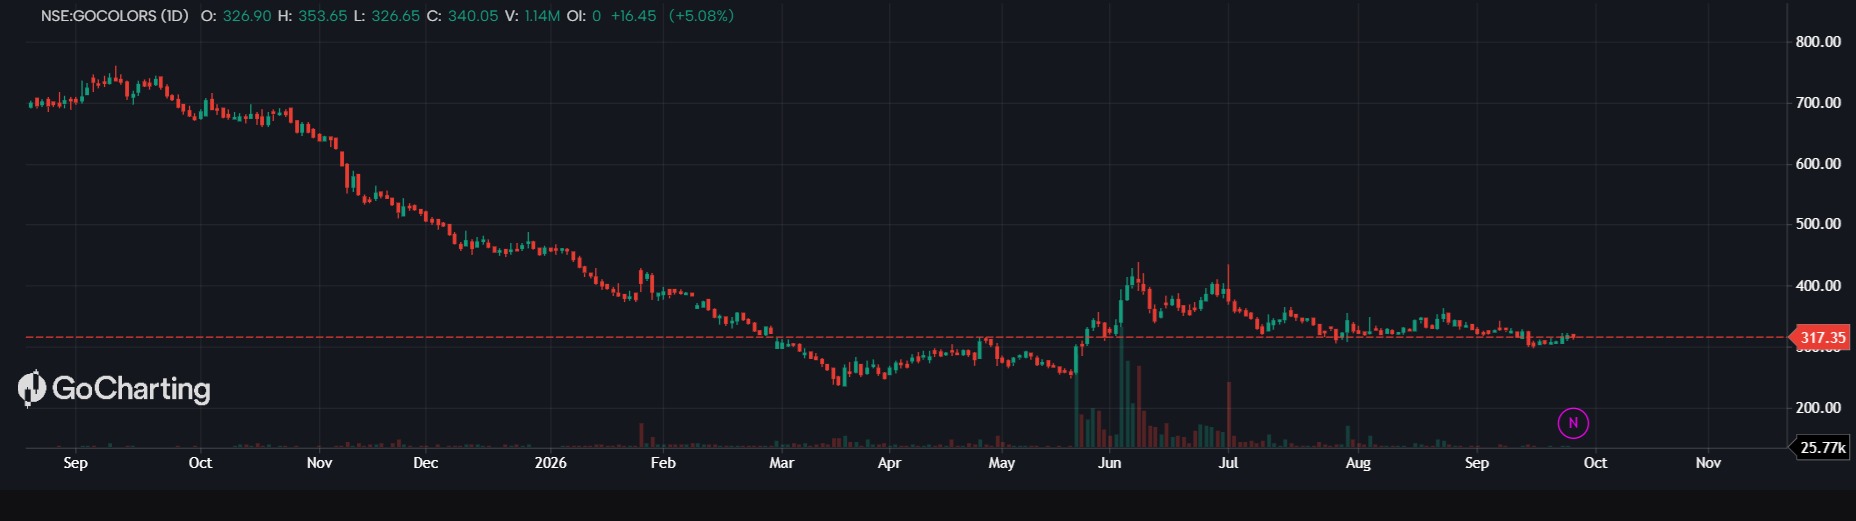 BullishGOCOLORS
Advance Scripting
Advanced Range Detector identifies high-quality consolidations using multi-window analysis, ATR-normalized tightness, percentile boundaries, rotation, boundary touches, containment, drift control, backward extension, breakout confirmation, overshoot absorption, and fakeout/deviation detection.
 Aijaz Khaja·1w ago
 NeutralTCS
Advance Range
Advance Range Detector A multi-factor Pine Script v6 engine for detecting, validating, tracking, and classifying price ranges/consolidations — with volatility normalization, structural quality filters, breakout confirmation, overshoot absorption, and fakeout/deviation handling. 1. Overview Advance Range Detector is designed to answer a more difficult question than: “Is price moving sideways?” Instead, it attempts to determine: “Is this a statistically tight, repeatedly tested, sufficiently balanced consolidation that deserves to be classified as a meaningful trading range?” The script evaluates a candidate range through several independent dimensions: Candidate Window │ ├── Boundary Calculation │ ├── Volatility / Tightness │ ├── Midline Rotation │ ├── Boundary Touches │ ├── Price Containment │ ├── Directional Drift │ └── Qualification │ ▼ Range Detected │ ┌─────┴─────┐ │ │ Confirmation Breakout │ │ ▼ ▼ Valid Range Breakout │ ┌──────┴──────┐ │ │ Fakeout Valid Break │ │ Deviation Breakout The key design philosophy is: A range should not be identified from width alone. A narrow price box can simply be a pause in a trend, a V-shaped reversal, a volatile spike, or an accidental clustering of candles. This script therefore combines multiple measurements. 2. Core Philosophy A high-quality range generally has several characteristics: 2.1 Tight enough The price should be relatively compressed compared with its recent volatility. 2.2 Repeated interaction Price should interact with both the upper and lower boundaries. 2.3 Rotation Price should repeatedly move between the upper and lower portions of the range. 2.4 Containment Most closes should remain inside the proposed range. 2.5 Limited directional drift The range should not simply be an upward or downward channel. 2.6 Persistence The consolidation should survive long enough to become meaningful. 2.7 Confirmed breakout A boundary violation should be meaningful rather than merely a marginal wick. These principles make the detector closer to a range-quality classifier rather than a simple highest-high/lowest-low indicator. 3. Detection Pipeline The script operates in several stages. PRICE DATA │ ▼ ┌───────────────────┐ │ Candidate Windows │ └─────────┬─────────┘ │ ┌─────────▼─────────┐ │ Boundary Engine │ └─────────┬─────────┘ │ ┌─────────▼─────────┐ │ Tightness Filter │ └─────────┬─────────┘ │ ┌────────────┼────────────┐ ▼ ▼ ▼ Rotation Touches Containment │ │ │ └────────────┼────────────┘ ▼ Drift Filter │ ▼ QUALIFICATION │ ▼ RANGE ACTIVE │ ┌─────────┴─────────┐ ▼ ▼ Confirmation Break Test │ ┌─────────┴─────────┐ ▼ ▼ Fakeout Breakout This is one of the strongest conceptual aspects of the script. 4. Window Selection The detector can test up to three different consolidation lengths. Base Base Window Default: 20 bars Double 20 × 2 = 40 bars Triple 20 × 3 = 60 bars When all three are enabled, the script checks: 60 → 40 → 20 and selects the longest qualifying window. This is important because it prevents a large consolidation from being unnecessarily represented as a smaller consolidation. For example: 60-bar range qualifies40-bar range qualifies20-bar range qualifies The detector chooses: 60 bars rather than chopping the structure down to 20 bars. 5. Boundary Engine The script supports three boundary methodologies. 5.1 Percentile Default: Top = 90th percentile of highsBottom = 10th percentile of lows This is particularly interesting because it attempts to reduce the influence of isolated extreme candles. Example: Highs:100101102103104105106107108140 ← abnormal spike A traditional highest-high method would use: Top = 140 The percentile approach can effectively ignore the extreme observation. Why this matters A single liquidity sweep should not necessarily redefine the entire consolidation. 6. Absolute Extremes The second method uses: Top = highest highBottom = lowest low This represents the literal price extremes of the window. Advantages: simple intuitive captures actual range extremes Disadvantages: extremely sensitive to outliers one wick can dramatically increase range height 7. Body Extremes The third method ignores candle wicks when defining boundaries. Upper boundary: highest(max(Open, Close)) Lower boundary: lowest(min(Open, Close)) This is effectively a body-based range. It can be useful when you want to distinguish: wick manipulation from: actual body acceptance 8. Volatility-Normalized Tightness One of the most important components is the ATR normalization. The script calculates: Range Height / ATR instead of simply asking: “Is the range 2 points wide?” This is important because 2 points mean very different things for different instruments. For example: Stock ARange = 2ATR = 1Range/ATR = 2 versus: Stock BRange = 2ATR = 10Range/ATR = 0.2 The second consolidation is much tighter relative to its volatility. 9. Tightness Ranking The script maintains: heightHistory[] This stores previously tested candidate range heights in ATR units. Then the current candidate is ranked against historical candidates. Conceptually: Current Range │ ▼Range Height / ATR │ ▼Compare against historical candidates │ ▼Percentile Rank │ ▼Is this unusually tight? Default requirement: Must be tighter than approximately the lower 30% threshold This gives the detector a relative volatility perspective. 10. Midline Rotation This is another strong idea in the script. The midpoint is: Mid = (Top + Bottom) / 2 The script tracks whether closing prices move above and below this midpoint. Example: Above ↓Below ↓Above ↓Below ↓Above This produces multiple rotations. The default requirement is: Minimum rotations = 4 Why? Consider two structures. Structure A / / / / / Price continuously trends upward. Structure B ┌─────────┐ │ ↕ ↕ ↕ ↕ │ │ ↕ ↕ ↕ ↕ │ └─────────┘ Price repeatedly rotates. Both might have similar width. But only the second behaves like a conventional range. Therefore: Rotation is being used as a proxy for two-sided order flow. 11. Boundary Touches The detector requires interaction with both sides. Default: Minimum upper touches = 2Minimum lower touches = 2 A touch is not required to exactly equal the boundary. Instead: Touch tolerance = 0.15 × ATR So the detector creates an ATR-scaled interaction zone. Conceptually: Upper Boundary━━━━━━━━━━━━━━━━━━━━━━━━ Touch Zone------------------------ RANGE------------------------ Touch Zone━━━━━━━━━━━━━━━━━━━━━━━━ Lower Boundary This is preferable to requiring exact price equality. 12. Containment The detector counts how many closes remain inside: Bottom ≤ Close ≤ Top Default: Minimum containment = 80% Therefore, if 20 bars are tested: At least 16 closes should remain inside. This prevents a proposed range from being constructed around a price structure that is actually experiencing frequent external closes. 13. Drift Detection This is another important quality filter. The script divides the window approximately into: First HalfSecond Half Then calculates: Average Price First HalfAverage Price Second Half The difference is compared with the range height. Formula conceptually: Drift %=abs(SecondHalfAverage - FirstHalfAverage)/RangeHeight× 100 Default: Maximum drift = 30% Why? Consider: Range A──────────── ↕ ↕ ↕ ↕ ↕──────────── versus: Range B ─────── / / /──────── Range B may technically fit inside a bounding box, but it is behaving more like a channel/trend. The drift filter attempts to reject that. 14. Range Qualification The candidate becomes a valid range only when all major conditions are satisfied: Tightness ANDRotation ANDUpper Touches ANDLower Touches ANDDrift ANDContainment In logical form: QUALIFIED = Tightness && Rotation && Upper Touches && Lower Touches && Drift && Containment This is much better than: Highest High + Lowest Low = Range 15. Backward Extension Once a range is detected, the script attempts to extend the left side backward. It checks earlier closes: Current candidate │ ▼Can previous close fit inside? │ YES │ ▼Go one more bar backward │ YES │ ▼Continue... until: Maximum backward extension is reached or price leaves the boundaries. Default: 100 bars This can reveal that the consolidation actually started much earlier than the initial detection window suggests. 16. Range State Machine The script uses a state machine. There are three primary states: NONEACTIVEWAITING NONE No active range exists. The detector scans for a new candidate. NONE │ │ candidate qualifies ▼ACTIVE ACTIVE The range is currently being monitored. Possible outcomes: ACTIVE │ ├── remains inside │ ├── absorbs overshoot │ ├── becomes confirmed │ └── breaks WAITING A confirmed breakout has occurred. The detector temporarily waits to determine whether the breakout is genuine or a deviation/fakeout. ACTIVE │ │ breakout ▼WAITING │ ├── returns inside │ ↓ │ DEVIATION │ └── remains outside ↓ BREAKOUT STANDS This state-machine architecture is a major strength of the design. 17. Provisional vs Confirmed Range The detector does not immediately treat a newly detected range as fully confirmed. Default: 5 bars Before confirmation: Dashed border After confirmation: Solid border This provides a useful distinction: Provisional “This looks like a range, but it hasn't demonstrated enough persistence yet.” Confirmed “The range has survived the required confirmation period.” This is a better conceptual model than treating every detected box equally. 18. Overshoot Absorption This feature attempts to distinguish: small liquidity sweep from: true breakout Suppose: Range Top━━━━━━━━━━━━━━━━ │ │ wick │ ▼ ↑ close back inside If the wick exceeds the boundary only slightly and the candle closes back inside, the script can expand the boundary. Default allowance: 0.15 × ATR So instead of immediately terminating the range: Old Top────────────── wickNew Top────────────── the range absorbs the excursion. 19. Breakout Buffer The detector does not necessarily accept a tiny breach. Default: 0.10 × ATR For a bullish close breakout: Close > Top + 0.10 ATR For bearish: Close This reduces sensitivity to tiny boundary violations. 20. Close vs Wick Breakout Two breakout modes are available. Close Requires: Close > Top + Buffer or: Close This emphasizes acceptance beyond the range. Wick Requires: High > Top + Buffer or: Low This is much more sensitive. Therefore: Close Mode= confirmation-oriented while: Wick Mode= event-oriented 21. Breakout Classification When a confirmed range breaks, the script determines direction: Bullish Breakout or: Bearish Breakout The box changes color accordingly. It also creates a: Breakout label. The script stores: breakDirbreakExtremebreakBar so the breakout can subsequently be evaluated for deviation. 22. Merge Deviation / Fakeout Handling This is one of the more advanced features. After breakout: WAITING The detector gives the market a defined number of bars to prove the breakout. Default: 5 bars If price closes back inside the original range: BREAKOUT ↓close returns inside ↓DEVIATION The original breakout marker is removed. The range resumes: ACTIVE This effectively treats the breakout as a failed expansion/deviation rather than a permanent structural transition. 23. Why This Is Different From a Basic Range Indicator A basic range detector might do: Highest HighLowest Low Your script does: Boundary+Volatility+Relative Tightness+Rotation+Touches+Containment+Drift+Persistence+Overshoot Handling+Breakout Buffer+Fakeout Handling That is a substantially richer framework. 24. Visual Architecture The chart can contain: Range box Represents the active consolidation. Midline Represents the 50% equilibrium level. 25% line Represents lower internal quartile. 75% line Represents upper internal quartile. Thus the box becomes: RANGE HIGH━━━━━━━━━━━━━━━━━━━━ 75%- - - - - - - - - - - 50%- - - - - - - - - - - 25%- - - - - - - - - - -━━━━━━━━━━━━━━━━━━━━ RANGE LOW This gives the user internal range positioning rather than only the outer boundaries. 25. Range Lifecycle A complete range lifecycle is approximately: SCAN │ ▼ Candidate Window │ ▼ Quality Qualification │ qualifies? / \ NO YES │ │ ▼ ▼ Continue RANGE │ ▼ Provisional │ ▼ Confirmation │ ┌────────┴────────┐ │ │ No Break Break │ │ │ ▼ │ Breakout │ │ │ ▼ │ WAITING │ / \ │ Return Stay out │ inside │ │ │ ▼ │ ▼ Breakout Stands │ Deviation │ │ └───────────┘ 26. What the Script Is Really Trying to Detect The underlying concept is not simply: “Sideways candles.” It is closer to: A statistically compressed area where price repeatedly rotates between two boundaries with sufficient two-sided interaction and limited directional displacement. That distinction is important. 27. Current Quality Scoring: The Major Missing Piece This is where I would improve your script substantially. Right now the detector is mostly: PASS / FAIL For example: rotation >= 4touches >= 2drift containment >= 80tightness = true But consider two ranges: Range A Rotation = 12Top Touches = 8Bottom Touches = 7Containment = 97%Drift = 3%Tightness = excellent Range B Rotation = 4Top Touches = 2Bottom Touches = 2Containment = 80%Drift = 29%Tightness = barely qualifies Both are currently: QUALIFIED = TRUE But they clearly have different structural quality. That is the biggest analytical opportunity. 28. Add a Range Quality Score Instead of only: QUALIFIED = TRUE/FALSE create: RANGE QUALITY SCORE = 0–100 For example: WeightTightness 20%Rotation 20%Boundary Interaction 20%Containment 15%Drift 15%Persistence 10% ─── 100% Then: 90–100 = Exceptional structural quality75–89 = High structural quality60–74 = Moderate structural quality However, I would not necessarily display these as trading recommendations. They should represent detector confidence/structural quality, not “buy/sell quality.” 29. Improve Tightness Measurement The current system compares candidate height/ATR against its own history. A stronger approach would consider: Range Height──────────────ATR plus: Range Height──────────────Average True Range plus potentially: Range Height──────────────Recent Median Range Height This would make the tightness estimate less dependent on the specific candidate history. 30. Add Volume Compression One major missing dimension is volume. A genuine consolidation often exhibits changes in participation. Possible metrics: Volume / Volume SMA and: Relative Volume Then examine whether volume contracts during the range. For example: Volume││ █│ █│ █│ █│ █│ █│ █└──────────────── RANGE This can add another dimension to range quality. But importantly: Low volume should not automatically mean a better range. It should be treated as context, not a standalone qualification rule. 31. Add Range Efficiency Another useful metric: Directional Movement────────────────────Total Movement A strongly trending market has high directional efficiency. A rotating market has lower directional efficiency. Conceptually: Trending:A → B → C → D → ERange:A → B → A → C → B → A A range detector could therefore calculate: Efficiency Ratio=abs(Net Change)/Sum(abs(Bar-to-Bar Changes)) Lower values indicate more back-and-forth movement. This complements your existing rotation metric extremely well. 32. Add Boundary Symmetry Currently you measure: Top touchesBottom touches But you could also measure their balance. Example: Top touches = 8Bottom touches = 2 This isn't the same quality as: Top touches = 5Bottom touches = 5 Create: Touch Balance For example: Touch Balance =1 - abs(topTouches - bottomTouches) / (topTouches + bottomTouches) This gives a more balanced representation. 33. Add Range Occupancy Another useful measurement is where price actually spends time. For example: Upper Zone━━━━━━━━━━████████Middle━━━━━━━━━━████Lower━━━━━━━━━━██ This tells you whether the market is: balanced or: accepting higher/lower prices This can be particularly useful when distinguishing: true equilibrium range from: re-accumulation / redistribution-like structures without forcing a directional interpretation. 34. Add Wick Rejection Statistics Since your detector already distinguishes wicks and bodies, you can calculate: Upper Rejection CountLower Rejection Count For example: Upper sweep │ ▼ wick━━━━━━━ boundary │ ▼close inside Repeated occurrences could indicate that the boundary is being actively rejected. This would be more informative than merely counting touches. 35. Add Boundary Respect A useful metric would measure how closely price respects the range. Example: Average Distance From TopAverage Distance From Bottom Normalized by ATR. You could then distinguish: Clean boundary from: messy boundary even when both technically satisfy the touch condition. 36. Improve Breakout Quality Currently: Breakout = boundary + ATR buffer A stronger breakout classifier could evaluate: 1. Break distance Break distance / ATR 2. Closing position Where did the candle close relative to its full range? 3. Follow-through Did subsequent candles continue away from the range? 4. Retest Did price return to the boundary? 5. Acceptance Did multiple closes remain outside? This produces a much more sophisticated breakout model: Boundary breach ↓Initial breakout ↓Acceptance test ↓Retest ↓Continuation 37. Improve Fakeout Detection Your current fakeout rule is: close returns inside within N bars That's useful, but it can be improved. For example: Breakout ↓Returns inside ↓How deeply? A close barely inside is different from: price completely traverses the range You could classify: Minor DeviationDeep DeviationFull Failure based on penetration depth. 38. Add Range Age Quality Currently you have: Minimum confirmation and optional: Maximum age But age could become part of the quality model. For example: 5 bars10 bars20 bars30 bars50 bars A range that remains structurally valid for longer may provide a different type of information than one that immediately breaks. Instead of simply: age >= confirmation you could calculate: Persistence Score 39. Add Structural Stability This would be a particularly useful advanced feature. Every new bar could recalculate: Top stabilityBottom stabilityMidline stabilityWidth stability Suppose: Top = stableBottom = stableWidth = stable Then the range is structurally stable. But if: Top keeps expandingBottom keeps expanding the detector may actually be witnessing volatility expansion rather than a stable range. 40. Add Range Expansion Detection A very useful companion metric: Current Range Height/Previous Range Height Then identify: CompressionExpansion This gives the lifecycle: Expansion ↓Compression ↓Range ↓Expansion This is much more informative than simply drawing boxes. 41. Add Nested Ranges This is probably one of the most valuable improvements. Imagine: 60-Bar Range┌───────────────────────────┐│ ││ 40-Bar Range ││ ┌───────────────┐ ││ │ │ ││ │ 20-Bar Range │ ││ │ │ ││ └───────────────┘ ││ │└───────────────────────────┘ Your current system chooses the longest qualifying range. But instead, an advanced engine could recognize: Parent RangeChild RangeNested Compression This would provide much richer structural information. 42. Add Multi-Timeframe Context The current detector works on the chart timeframe. A more advanced architecture could use: HTF │ ▼Macro Range │ ▼Current TF Range │ ▼LTF Range For example: 4H → structural range1H → active range15m → local range5m → execution structure The important principle would be: Higher timeframe defines context; lower timeframe defines local structure. The detector should not simply mix data from different timeframes into one box. 43. Add Range Classification Once quality metrics are available, the engine could classify ranges. For example: BALANCED RANGE when: High rotationLow driftBalanced touchesHigh containment Another: COMPRESSED RANGE when: Extremely low height / ATR Another: EXPANDING RANGE when: Range width progressively increases Another: DRIFTING RANGE when: Directional displacement increases This is more informative than simply: RANGE 44. Suggested Architecture 2.0 I would evolve your script toward this architecture: ADVANCE RANGE ENGINE │ ┌─────────────────┼─────────────────┐ │ │ │ ▼ ▼ ▼ Boundary Volatility Structure Engine Engine Engine │ │ │ │ │ ┌──────┼──────┐ │ │ │ │ │ │ │ Rotation Touch Drift │ │ └─────────────────┼─────────────────┘ │ ▼ QUALITY ENGINE │ ┌─────────────────┼─────────────────┐ │ │ │ ▼ ▼ ▼ Containment Symmetry Stability │ │ │ └─────────────────┼─────────────────┘ ▼ QUALITY SCORE 0–100 │ ▼ RANGE CLASSIFIER │ ┌──────────────┼──────────────┐ ▼ ▼ ▼ Balanced Compressed Drifting │ ▼ BREAKOUT ENGINE │ ┌─────────────────┼─────────────────┐ ▼ ▼ ▼ Breakout Retest Fakeout │ ▼ FINAL EVENT 45. Recommended Future Metrics If you want this to become a genuinely advanced range-analysis engine, I would add these: MetricPurposeATR-normalized widthVolatility-adjusted range sizeRotation countTwo-sided movementTouch countBoundary interactionTouch symmetryBalance between boundariesContainmentInternal acceptanceDriftTrend/channel rejectionEfficiency ratioMeasures directional efficiencyVolume compressionParticipation contextWick rejectionBoundary rejectionWidth stabilityRange consistencyMidline stabilityEquilibrium stabilityPersistenceDurationExpansion ratioCompression → expansionBreakout distanceBreak strengthBreakout acceptancePost-break behaviorRetest qualityBoundary validationDeviation depthFakeout severityNested-range relationshipMulti-scale structure 46. One Important Conceptual Change The biggest upgrade I'd recommend is changing the mental model from: IF conditions pass → RANGE to: CANDIDATE │ ▼ ┌─────────────┐ │ Measurements│ └──────┬──────┘ │ ▼ QUALITY SCORE 0 → 100 │ ┌──────────┼──────────┐ ▼ ▼ ▼ Weak Moderate Strong │ │ │ Reject Monitor Track This gives you much more information. A detector should ideally tell you: Why is this a range? not merely: Is this a range? 47. Example of a High-Quality Range Report A future version could internally produce something like: ADVANCE RANGE────────────────────────Range Quality: 87/100Window: 40 barsWidth / ATR: 1.42Rotation: 9Upper Touches: 6Lower Touches: 5Touch Balance: 0.91Containment: 94%Drift: 8%Efficiency: 0.18Width Stability: HighVolume State: ContractingClassification:BALANCED CONSOLIDATIONStatus:CONFIRMEDBreakout:NOT YET CONFIRMED That would be significantly more analytical than the current: RANGE 40 BARS 1.42% 48. What Your Current Script Already Does Well The strongest parts of your existing design are: ✅ Multi-window detection 20 / 40 / 60-bar analysis. ✅ ATR normalization Makes the logic adaptive to volatility. ✅ Percentile boundaries Reduces sensitivity to isolated extreme wicks. ✅ Rotation filter Helps reject V-shaped reversals and trends. ✅ Two-sided touch requirement Prevents one-sided structures from being called ranges. ✅ Drift filter Helps distinguish consolidation from directional channels. ✅ Containment Requires actual internal price acceptance. ✅ Backward extension Allows the range to represent more historical structure. ✅ Confirmation state Separates provisional and established ranges. ✅ Overshoot absorption Handles small boundary sweeps. ✅ Breakout buffer Reduces insignificant boundary breaches. ✅ Deviation handling Attempts to distinguish fakeouts from genuine breakouts. ✅ State-machine architecture Makes the indicator much easier to extend. 49. Current Weaknesses The biggest limitations are not that the script lacks features; it's that some features are still binary. For example: Rotation >= 4 doesn't distinguish: 4 rotations from: 12 rotations Similarly: Containment >= 80% doesn't distinguish: 80% from: 98% And: Drift doesn't distinguish: 29% from: 3% That information is being thrown away. 50. The Next Version Should Preserve Raw Measurements Instead of: rotationOK = rotations >= minRotations think: rotationScore Instead of: containmentOK think: containmentScore Instead of: driftOK think: driftScore Then combine them. Conceptually: Quality = Tightness Score + Rotation Score + Touch Score + Containment Score + Drift Score + Stability Score This allows the detector to become continuous rather than binary. 51. Final Concept Your current indicator is best described as: A rule-based multi-factor consolidation detector with volatility-normalized boundaries and event-state management. The more advanced version would become: A multi-dimensional market range analysis engine that measures compression, equilibrium, boundary interaction, structural stability, participation, and breakout behavior across multiple scales. That is the direction I'd take. In short: CURRENT VERSIONDetect Range ↓Validate Range ↓Track Range ↓Detect Breakout ↓Detect Deviation ADVANCED VERSION Detect Candidate ↓Measure Structure ↓Measure Volatility ↓Measure Participation ↓Measure Boundary Quality ↓Measure Balance ↓Measure Stability ↓Calculate 0–100 Quality ↓Classify Range ↓Track Lifecycle ↓Detect Breakout ↓Measure Breakout Quality ↓Detect Retest / Acceptance ↓Classify Deviation / Failure
 Aijaz Khaja Mohammed Sajid·1w ago
 BullishNIFTY
dvsBVdsv
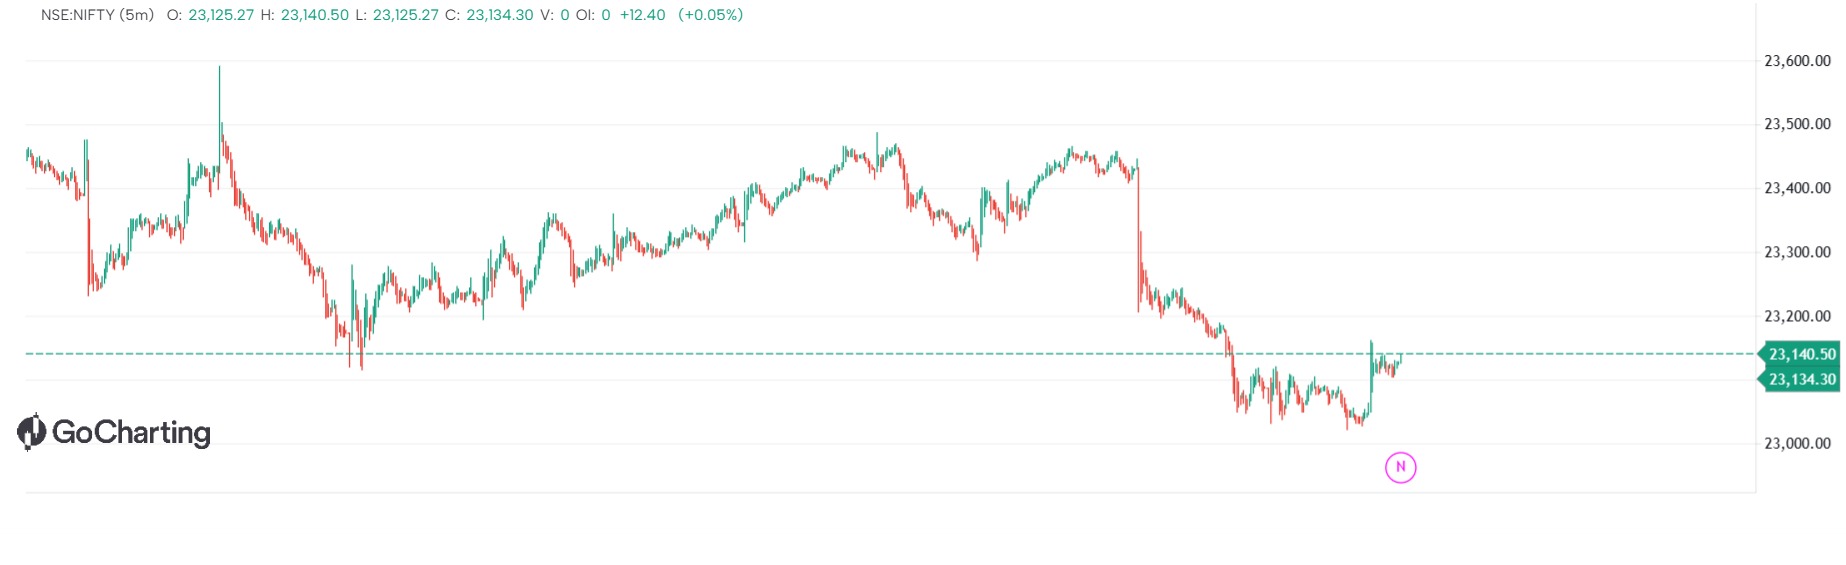
//@version=5 indicator("Oracle Algo Suite Replica", overlay=true, precision=2) // Inputs for the Trend Ribbon / Cloud fast_len = input.int(10, title="Fast MA Length") slow_len = input.int(20, title="Slow MA Length") ma_type = input.string("EMA", title="MA Type", options=["EMA", "SMA"]) // Function to calculate moving averages f_ma(type, src, len) => type == "EMA" ? ta.ema(src, len) : ta.sma(src, len) fast_ma = f_ma(ma_type, close, fast_len) slow_ma = f_ma(ma_type, close, slow_len) // Plotting the Cloud Ribbon p1 = plot(fast_ma, title="Fast MA", color=color.new(color.green, 20)) p2 = plot(slow_ma, title="Slow MA", color=color.new(color.red, 20)) // Color the fill between the two moving averages (Green for bullish, Red/Purple for bearish) cloud_color = fast_ma > slow_ma ? color.new(color.green, 60) : color.new(color.purple, 60) fill(p1, p2, color=cloud_color, title="Trend Cloud") // Signal Logic (Simulating Buy, Strong Buy, and Sell label triggers based on crossovers) bullish_cross = ta.crossover(fast_ma, slow_ma) bearish_cross = ta.crossunder(fast_ma, slow_ma) // Strong signal condition (e.g., price momentum confirmation or wider separation) strong_bullish = bullish_cross and (close - slow_ma) > ta.stdev(close, 20) strong_bearish = bearish_cross and (slow_ma - close) > ta.stdev(close, 20) // Plotting Buy / Sell / Strong Buy markers on chart plotshape(bullish_cross and not strong_bullish, title="Buy Signal", style=shape.labelup, location=location.belowbar, color=color.green, text="Buy", textcolor=color.white, size=size.small) plotshape(strong_bullish, title="Strong Buy Signal", style=shape.labelup, location=location.belowbar, color=color.new(color.green, 0), text="Strong Buy", textcolor=color.white, size=size.small) plotshape(bearish_cross, title="Sell Signal", style=shape.labeldown, location=location.abovebar, color=color.red, text="Sell", textcolor=color.white, size=size.small) // Alert conditions for automation alertcondition(bullish_cross, title="Buy Alert", message="Oracle Algo: Buy Signal Triggered") alertcondition(strong_bullish, title="Strong Buy Alert", message="Oracle Algo: Strong Buy Signal Triggered") alertcondition(bearish_cross, title="Sell Alert", message="Oracle Algo: Sell Signal Triggered")
 Ayush·1w ago
 XAUUSD
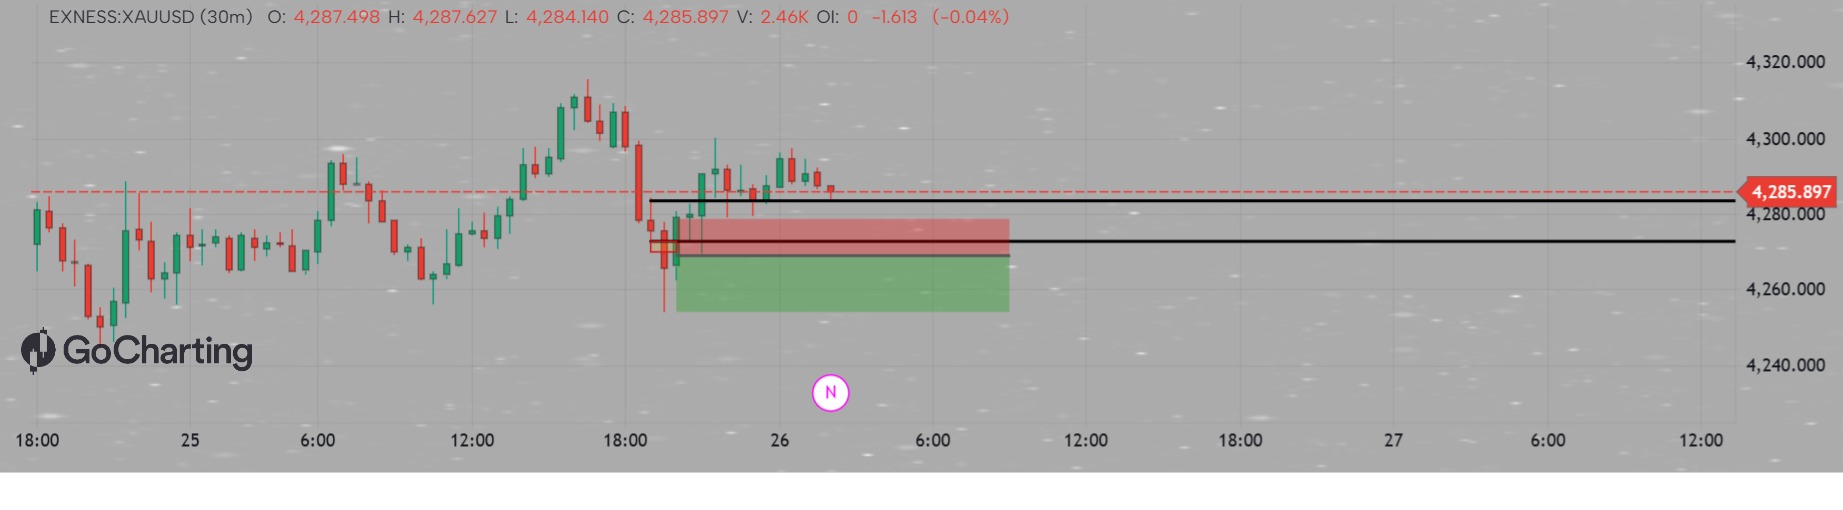
my akgo
 Zx_ SAM·1w ago
 Bullish
 BTCUSD
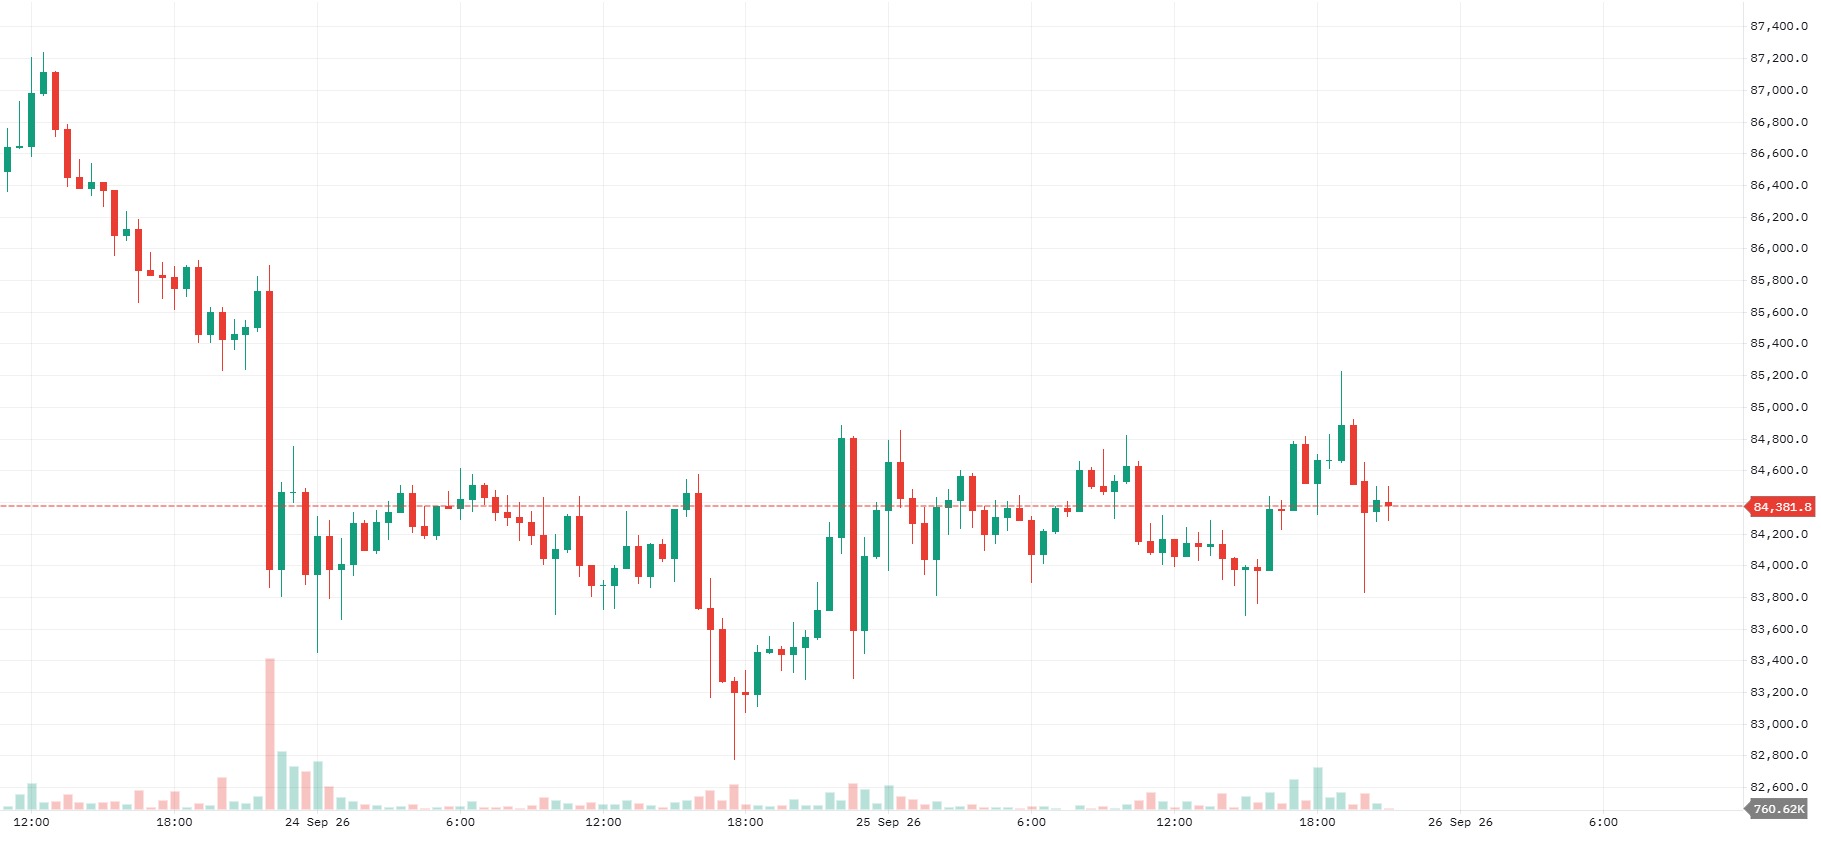
currently maintaining a broader bullish
Bitcoin ($BTC$) is currently maintaining a broader bullish structure, consolidating in the $83,500 – $85,000 range after hitting a recent swing high near $87,400. Below is the multi-timeframe technical breakdown: Key Technical Indicators (Daily Timeframe) Trend & Moving Averages: Strongly Bullish Stack. BTC is trading comfortably above all key Exponential Moving Averages: the 20-EMA (~$79,400), 50-EMA (~$75,400), and the 200-EMA (~$70,700). Holding above the 200-EMA keeps the macro bull cycle fully intact. RSI (14): Sitting around 64 – 68. This indicates healthy upside momentum without entering extreme overbought territory (>70–80), leaving room for another leg up. MACD: The daily MACD line remains above the signal line with a positive histogram, though hourly charts are showing minor momentum deceleration or compression—typical during post-rally consolidation.
 Master AI ·1w ago
 NIFTY
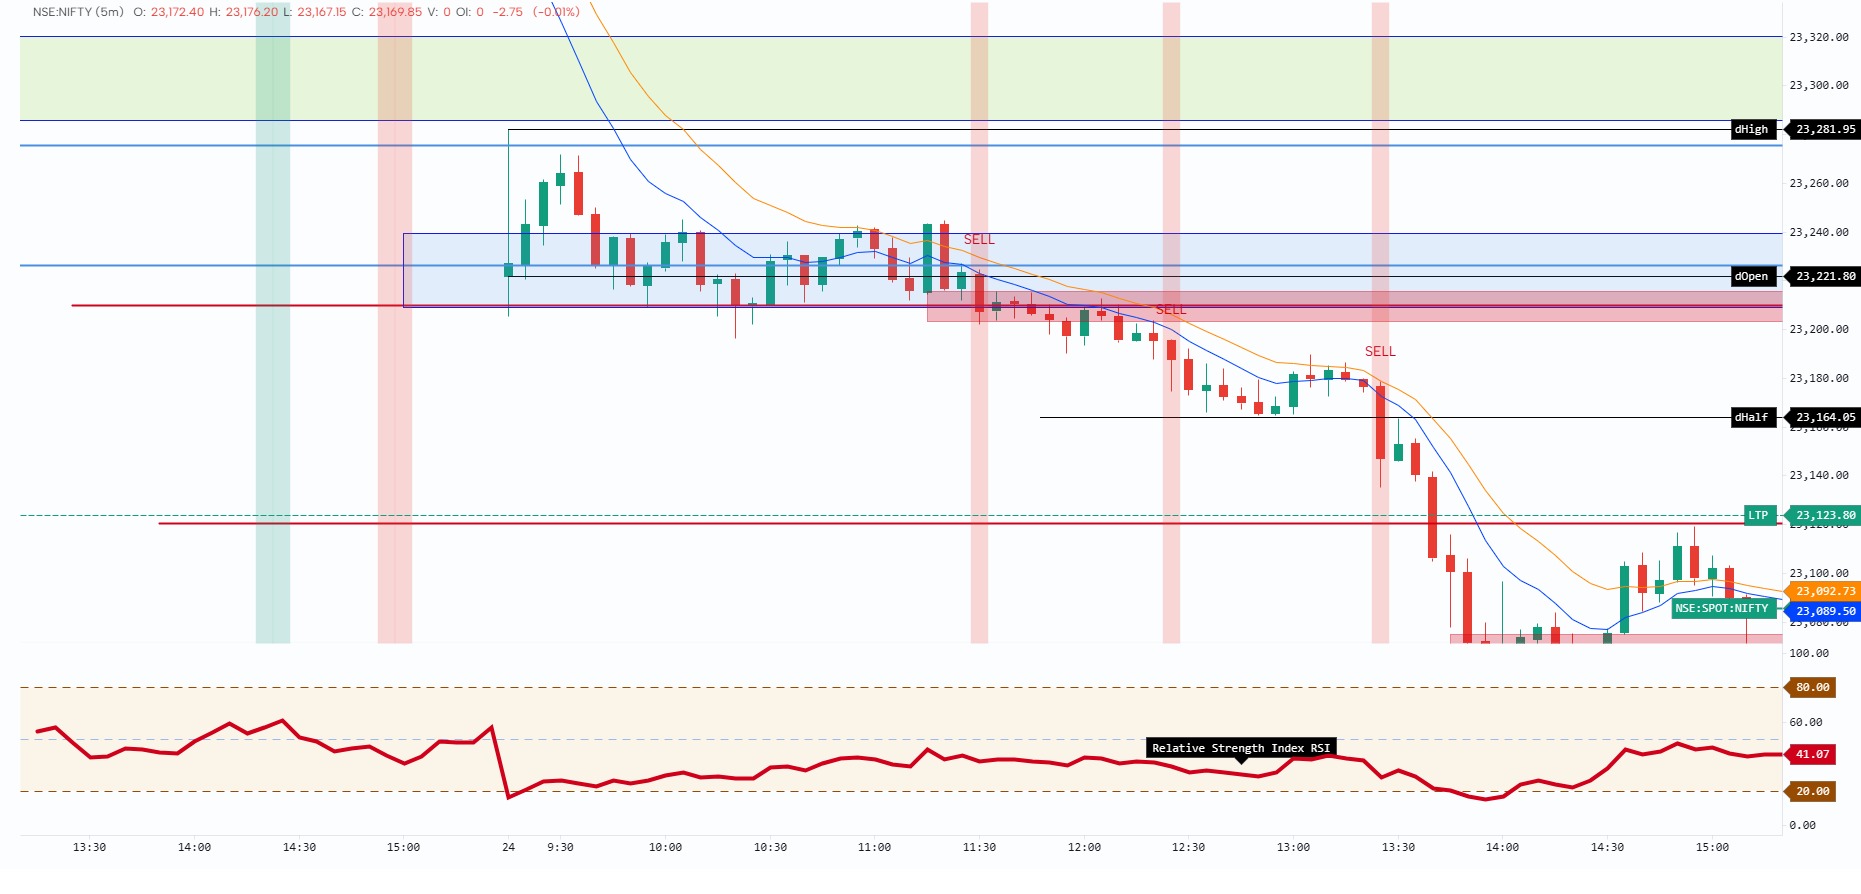
NIFTYPRICE ACTION BUY SELL INDICATOR
THIS PRICE ACTION INDICATOR GIVES YOU ENTRY, TARGET AND STOP LOSS. THE CONFIRMATION TRADE IS 10 OUT OF 7. STOP LOSS IS VERY SMALL. TARGET IS 1:2 OR 1:3 RATIO.
 BYRAPPAN M·1w ago
 neutralNESTLEIND
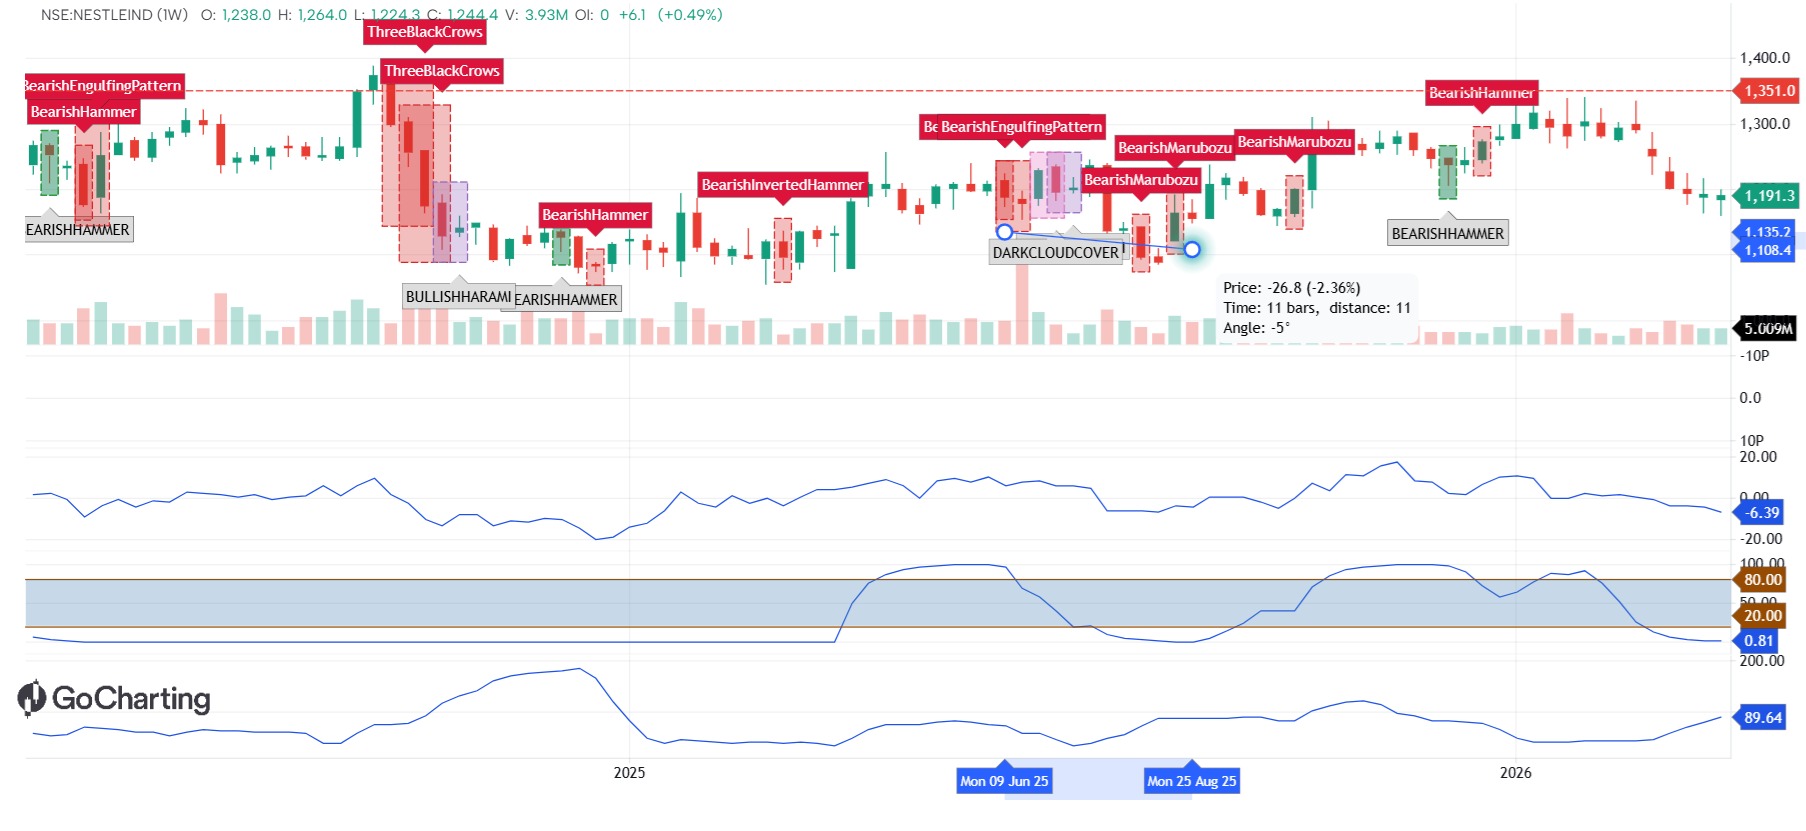
Nestle technical Analysis
The analysis of Nestlé India shows the presence of several bearish reversal patterns, including Bearish Engulfing, Three Black Crows, Bearish Hammer, Bearish Inverted Hammer, and Bearish Marubozu. These patterns generally appeared near resistance or after upward price movements, indicating potential selling pressure and trend-reversal signals. The chart also shows periods of consolidation followed by strong directional movements, with volume providing additional confirmation for some signals. Overall, the identified candlestick patterns provide useful entry and exit signals when combined with support, resistance, and volume analysis.
 Adarsh Ranjan·1w ago